Healthy Eating with Cancerwife
I love to eat. Food delights me.
Even when I stayed in the hospital for chemo, I looked forward to each meal and snack. Some of the hospital food was not that great, but I found some appetizing items!
When I had to make the difficult decision to have my jaw joint and surrounding area surgically removed, the ability to eat was one of my main concerns. The top priority was to survive, even if it meant that I would have difficulty eating. I knew that I could adapt to my limitations and still enjoy food. I was prepared to blend all my food and drink it - for the rest of my life.
It's now been more than 2 years since I had my jaw surgery. Even though jaw is shifted and my teeth don't meet up, I've been able to eat almost everything, apart from al dente noodles and chewy bread. That's not bad, considering that initially I thought I had to liquify all my food!
I'm constantly looking for foods that are healthy and delicious to eat. I enjoy cooking and trying new dishes. Quick, easy and delicious is my motto! I use the Instant Pot electric pressure cooker and the Nuwave Oven for most of my cooking. When I occasionally go out to eat, I try to make the healthiest choice I can.
Recently I've been on a low omega 6 diet that I believe has helped my cancer stay under control. To encourage others towards healthy eating that can make a real difference to health, I want to share dishes that I cooked and healthy choices I found when eating out.
Here's to healthy eating!
Cancerwife
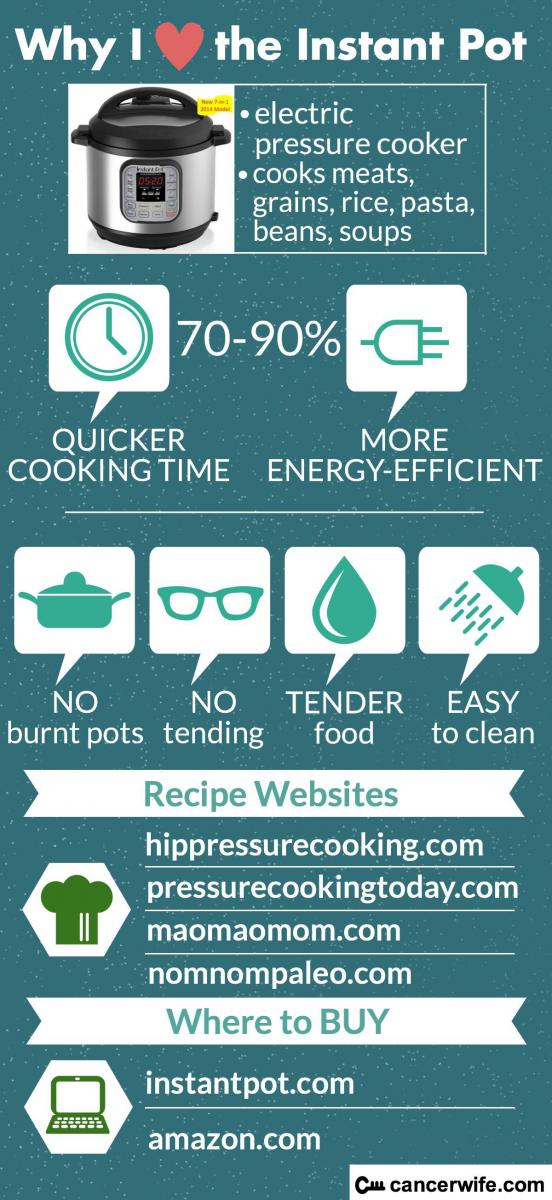
Why I Love the Instant Pot Electric Pressure Cooker

Why an electric pressure cooker vs. a regular pressure cooker?
Pressure cooking, which is cooking under high pressure, reduces cooking time. The Instant Pot is unique in that it automatically controls the temperature to maintain the pressure. Instead of spending time to look after and manually adjust the temperature of a pressure cooker on the stove, the Instant Pot does it for you! With the Instant Pot, you just need to put all your ingredients in, press a few buttons, and the Instant Pot will do the rest!
I got an Instant Pot after I burnt one too many pots that I had forgotten on the stove!

One advantage of the Instant Pot over other electric pressure cookers is that it has a stainless steel inner pot. Many other electric pressure cookers have teflon (non-stick) coated pots. I prefer stainless steel over non-stick coatings to minimize unwanted chemicals and toxins in my food.
What can I make in the Instant Pot?
Anything that you normally steam, stew, slow cook or boil can be cooked in the Instant Pot.
The "Slow Cook" function of the Instant Pot completely replaces the slow cooker in your kitchen! In order to slow cook, you need to keep the lid on the "Venting" position, so that pressure does not build up in the pot.
The Instant Pot also has a "Saute" function, allowing you to brown or pan fry aromatics before pressure cooking.
There are many recipes for the Instant Pot. I recommend following recipes when you first get the Instant Pot to familiarize yourself with the difference in cooking times with Instant Pot.
Here are some of my favorite websites for Instant Pot recipes:
- A comprehensive set of recipes for the Instant Pot and pressure cooker, a table with cooking times for various foods.
- Lots of pressure cooker recipes, including "baked" desserts!
- Chinese cuisine Instant Pot recipes.
- Paleo recipes. Search for "Instant Pot" on the site to pull up her Instant Pot recipes. Some favorites are the Kalua Pork and Spaghetti Squash.
I use my Instant Pot almost everyday, and here are some of my own favorite recipes!


Ok, I'm finally convinced I should get the Instant Pot. Where can I buy one?
I'm glad you are ready to take the plunge! It will be life-altering once you get used to the Instant Pot and find recipes that you like!
The manufacturer sells it directly, at https://instantpot.com/store/home.php.
You can also get it from Amazon, with free 2-day shipping.
I have the Instant Pot IP-DUO60 7-in-1 Programmable Pressure Cooker, 6 quarts.
The usual price of the Instant Pot is around $130 from Amazon. During Black Friday 2015 there was a humongous Instant Pot sale, when it only cost $78.50. I don't know if it will ever drop to that price again though.
A good way to keep track of any drop in prices for the Instant Pot on Amazon is to enter the Instant Pot into www.camelcamelcamel.com, a site that notifies you by email when it drops to your desired price. Pretty nifty, right?
Any gadgets that will help cooking with the Instant Pot?
There is a useful steam rack with two handles that comes with your Instant Pot. It keeps your food away from the water below while steaming. It's good for steaming large items such as squashes or a whole chicken.
There are a few items that I found to be useful for my Instant Pot cooking:

A glass lid was the first thing I bought to use with my Instant Pot. It is perfect for covering the pot when I saute aromatics that tend to splatter all over. I learned the hard way that the pressure cooker lid does not function well after I used it to cover up oil splatter. The lid is also useful when I am storing Instant Pot left overs in the fridge.
Note that the official Instant Pot Lid has a hole to let out steam.
I actually purchased a Fagor 8.5-inch lid from Amazon, but it's not in stock anymore. It doesn't have a steam hole on the lid. It fit perfectly on my Instant Pot, but after a year of use, it seems to be a bit tight on the pot. Does anyone have any experience with the official Instant Pot lid not fitting exactly over time?

A stainless steel vegetable steamer works quite well if you have small loose vegetables to steam. Just pour a cup of water at the bottom of the Instant Pot, then put your vegetables on top of the steam rack.
It's also quite useful as a separator when you are cooking two things in the Instant Pot that you don't want mixed together. I have used it to separate out the bones from the vegetables that I cook together in a pot of soup.

Um, yes, that's a dog bowl right there...
I have a 2 cup stainless steel bowl that I use in the Instant Pot to steam rice along with the stews that I make. It fits perfectly into the Instant Pot. I bought it from Daiso, a Japanese dollar store. It looks exactly like this dog bowl that is selling on Amazon. I guess I had bought a dog bowl at Daiso...I guess as long as it's safe for dogs, it should be safe for us? 
In any case, it's the perfect accessory for the Instant Pot, as it allows you to cook rice along with your dish!

And to take out your steaming bowl of rice or cooked squash, a plate holder tong such as this will save you from burning your fingers!
Any tips on how to use the Instant Pot?
Let me know what you think of the Instant Pot and your favorite thing to make with the Instant Pot!
Happy Instant Potting!
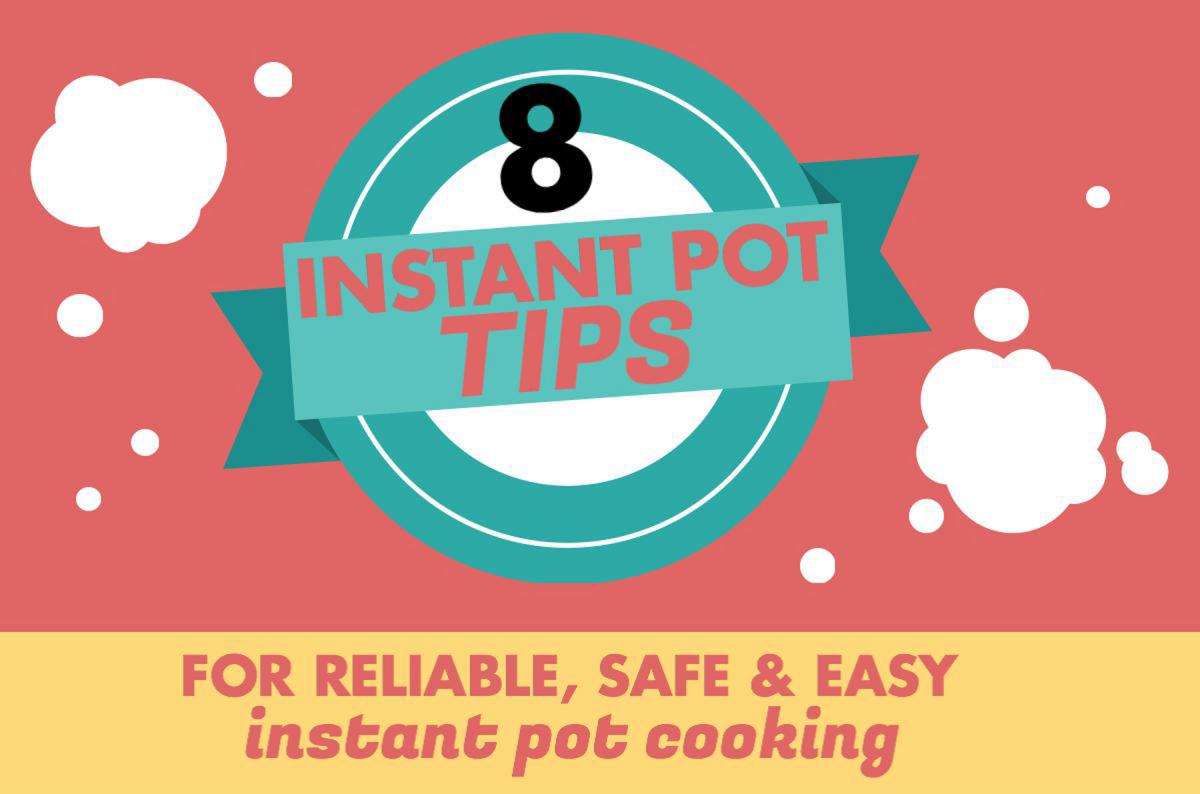
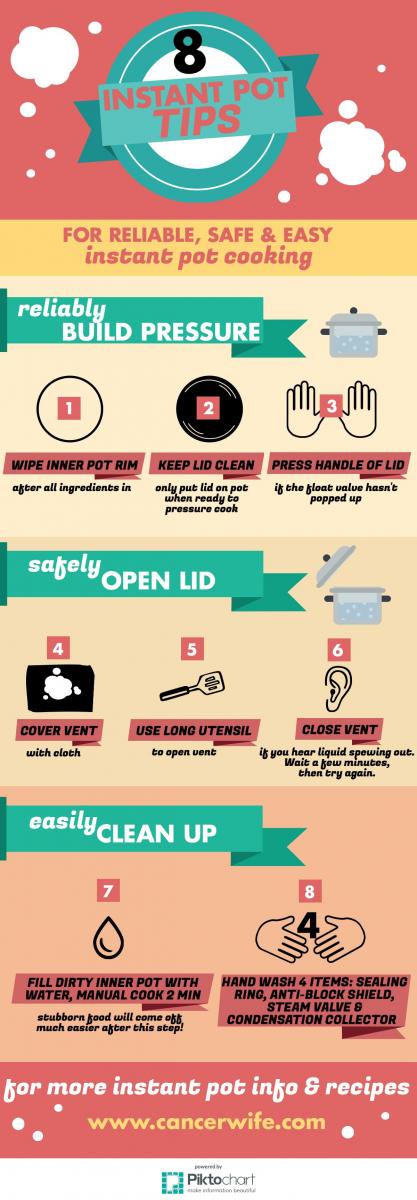
8 Instant Pot Tips for Reliable, Safe and Easy Instant Pot cooking
 After several years of using the Instant Pot almost daily, I've learned some quirks and tricks to using the Instant Pot.
I hope these 8 tips will help you cook reliably, safely and easily with the Instant Pot!

The first major hurdle is ensuring the Instant Pot builds up pressure, signified by the float valve (the silver metal cylinder) popping up.
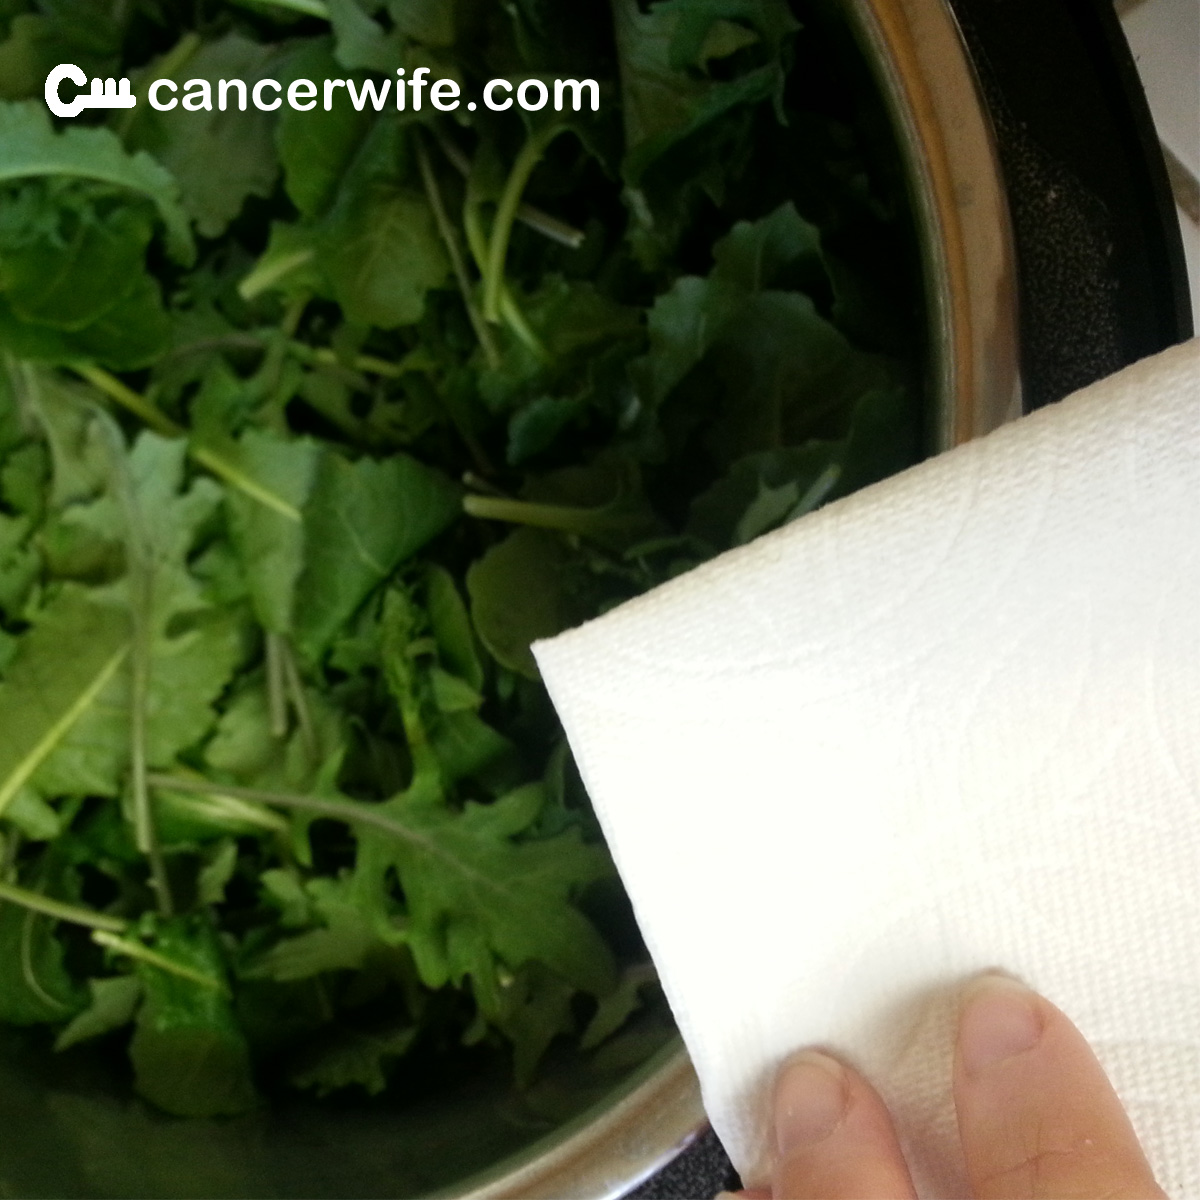
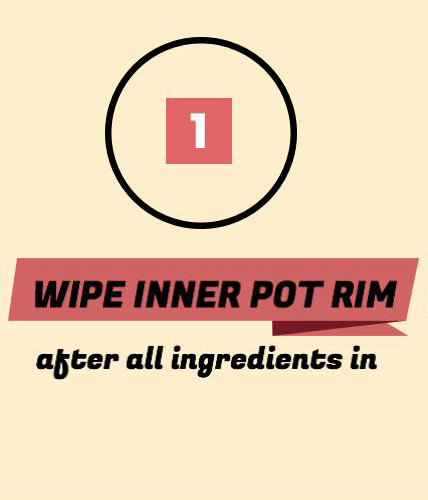 Tip #1 - Wipe the Inner Pot Rim
after all the ingredients are put in.
I cannot tell you how many times the lid not seal correctly, leading to no pressure build-up and my pasta dish becoming a sad mush.
Whatever dish you make, make it a habit to wipe down the inner pot rim after all the ingredients are in.
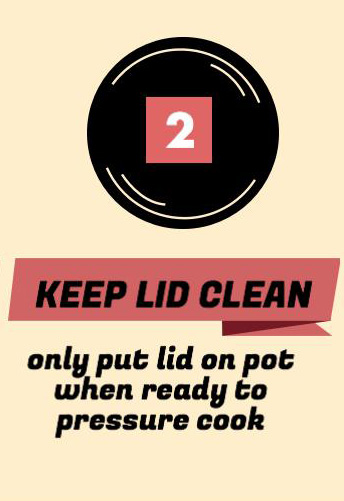
Tip #2 - Keep the Lid Clean
Only put the Instant Pot lid onto the pot when you are ready to pressure cook.
I made the mistake many times where I used the Instant Pot lid to cover my sauting food. I would often find that the pressure did not build correctly afterwards.
If you want to cover sauting food to avoid splatter, I recommend you buy a regular glass lid that fits the Instant Pot.
If the Instant Pot lid's silicone ring has some food particles or oil/liquid splatter, wash it well with soap before putting it on for pressure cooking.
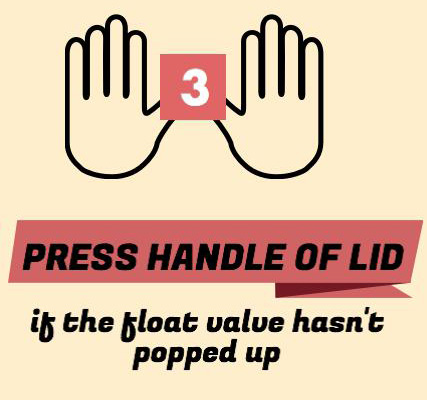 Tip #3 - Press the Handle of the Instant Pot Lid
if the float valve hasn't popped up, and you see steam coming out.
Sometimes the Instant Pot lid just needs a little help to seal up. I find that using both hands to give the lid a little push down helps the float valve to pop up.

One of the scariest thing you need to get used to with the Instant Pot is opening the lid! When cooking is done, and you need to do a quick release (QR) to open the lid, you can do it very safely without ever getting a steam burn.

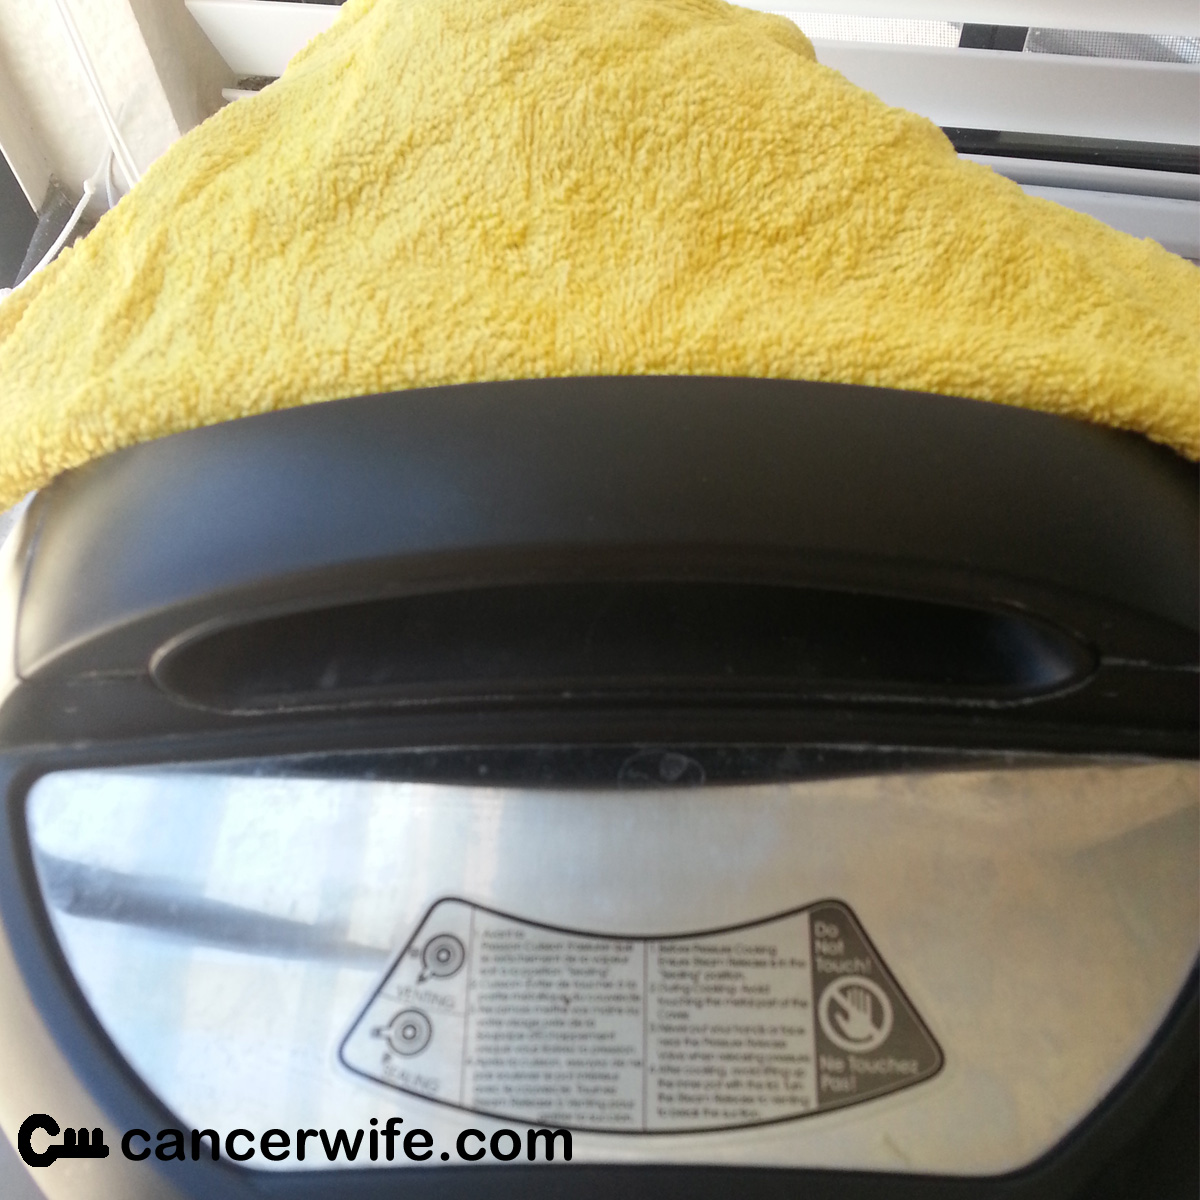
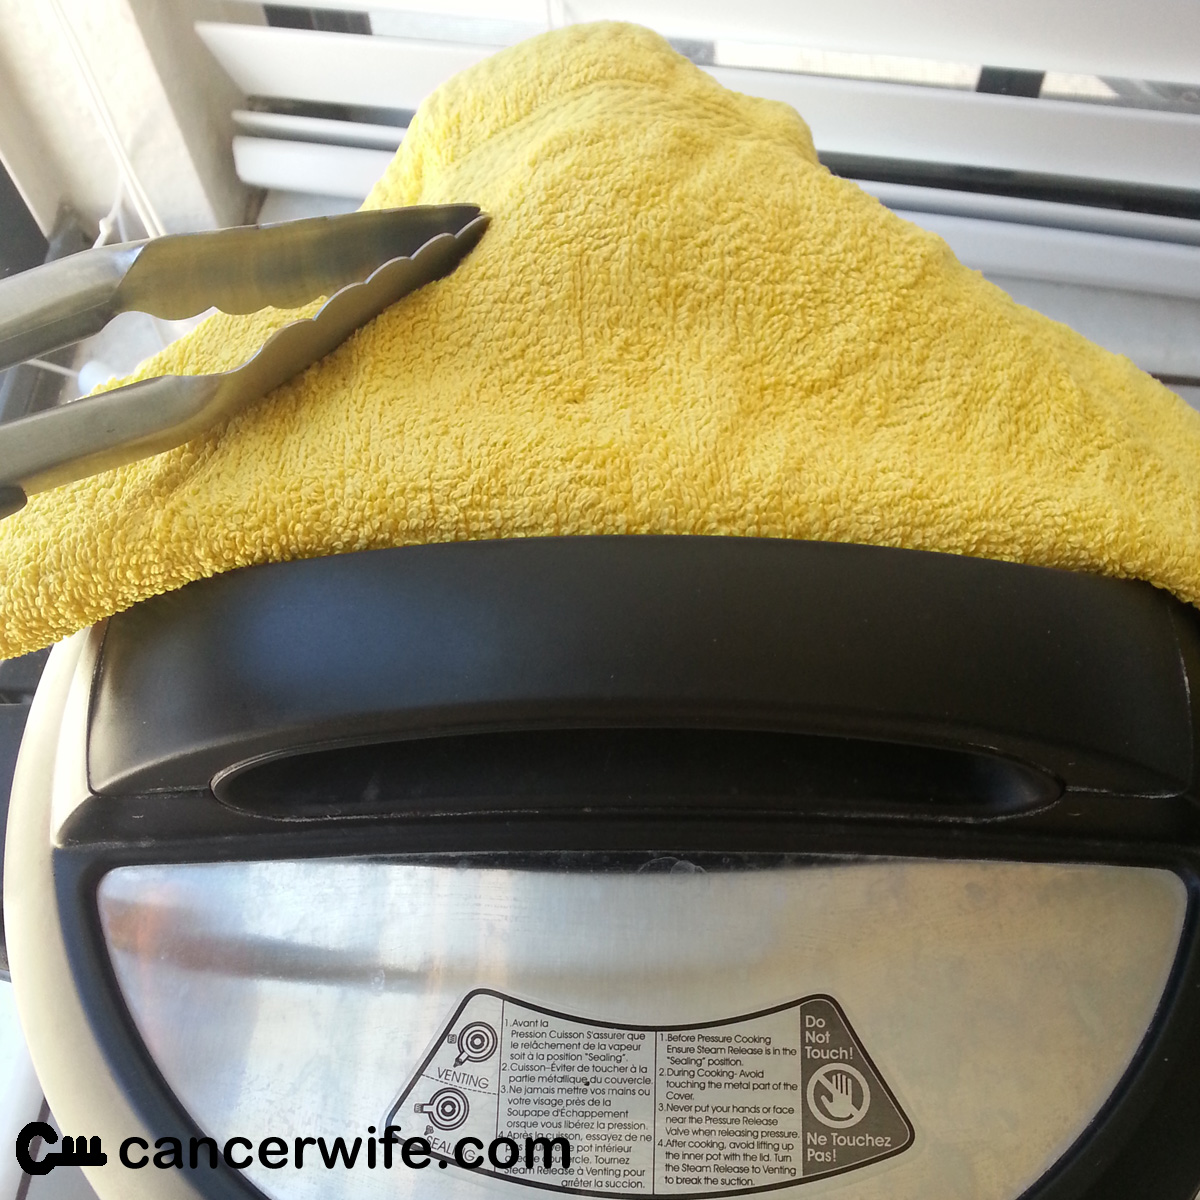
Tip #4 - Cover Vent with Cloth
If there is a chance that liquid or food particles will come out of the vent with quick release, this prevents liquid or food particles from spraying all over your kitchen walls.
I cover only the half of the lid with the steam release handle, and I do not cover the handle of the lid. This is so that the steam does not heat up the lid handle so you can turn the lid handle without burning yourself.
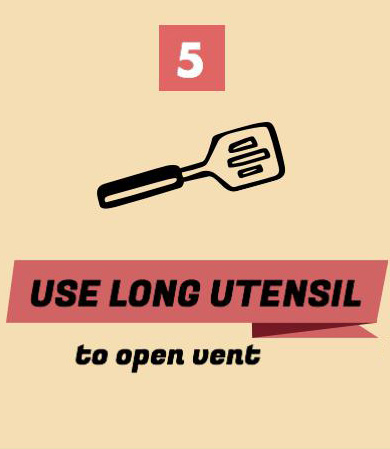
Tip #5 - Use Long Utensil to Open Vent
NEVER use your hand to flick open the steam release handle!!
Always use a long utensil. In this picture I'm using a pair of tongs. A spatula, a long spoon, a pair of chopsticks - these will all work.
You need to flick the steam release handle (under the cloth) towards yourself to open it.
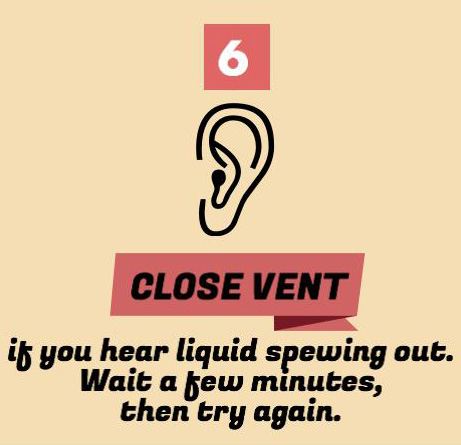
Tip #6 - Close Vent if You Hear Liquid Spewing Out
Sometimes when there is more liquid in the pot, the high pressure difference during quick release can make the liquid come out of the steam release handle.
If you hear a lot of liquid coming out, it may be best to flick the steam release handle back away from you (to close it), wait a few minutes for the contents of the pot to cool down a little before opening the steam release handle.

Once you enjoyed your Instant Pot deliciousness, it's time for clean up. Here are some easy ways to clean your Instant Pot!

Tip #7 - Fill the Dirty Inner Pot with Water, Manual Cook for 2 Minutes
It's especially hard to clean the one pot pasta when there is pasta stuck to the bottom of the pot.
After taking all the pasta out, I would put about a cup (or two) of water into the bottom of the inner pot, so that the stubborn food particles are covered by the water. Then, manual cook it for 2 minutes. You can quick release or slow release depending how much time you have. This will steam clean the inner pot.
Give the pot a good scrub, then put it in the dishwasher!
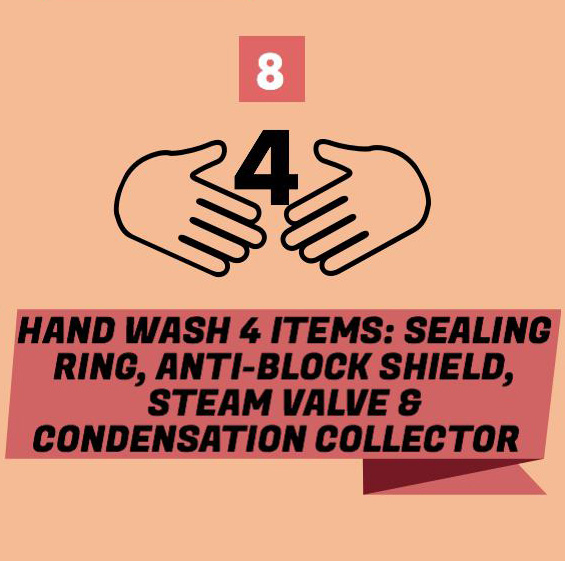
Tip #8 - Hand Wash 4 Items: Sealing ring, Anti-block Shield, Steam Valve and Condensation Collector
There are little things to hand wash, but it's often easy to forget them.
Remember the number 4!
The sealing ring, anti-block shield and steam valve are all on the lid.
The condensation collector is at the back of the Instant Pot.
I hope these tips will make your Instant Pot cooking even more enjoyable and safe! I love my Instant Pot, and I know you will too!
Blueberry Chia Egg Oatmeal
 I've been searching for a good breakfast food that is fast to make, low in carbs and high in protein.
I may have found it with this recipe!
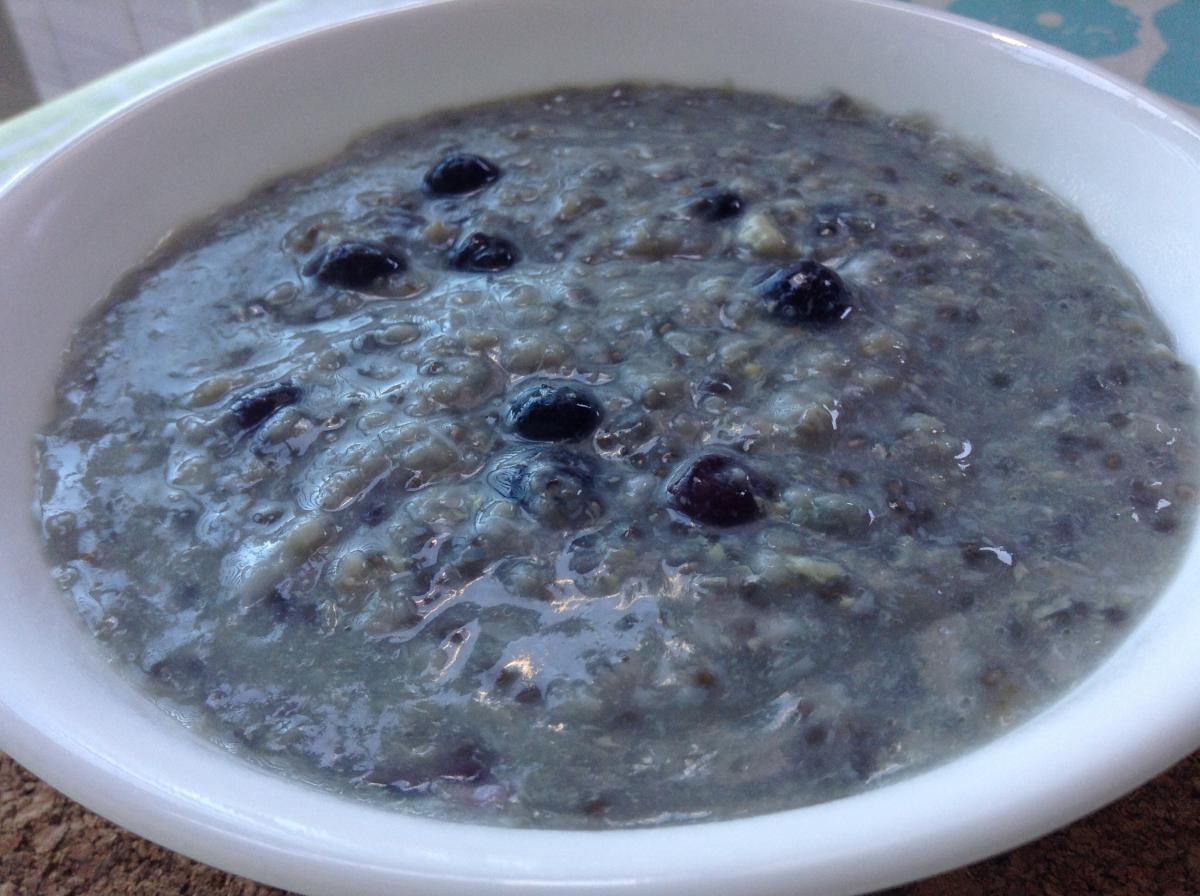
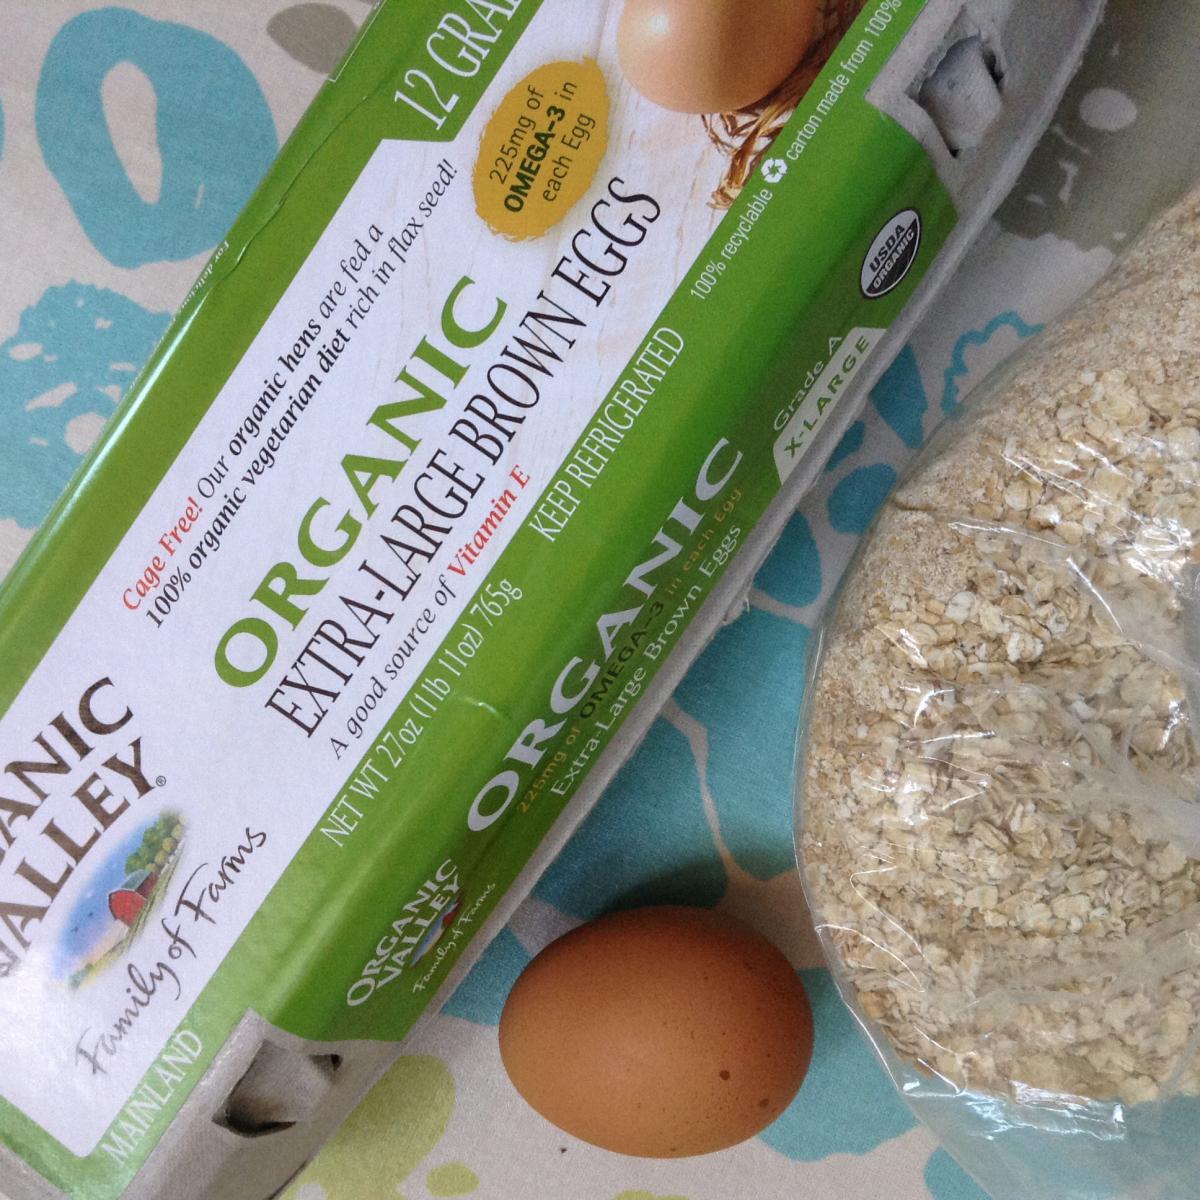
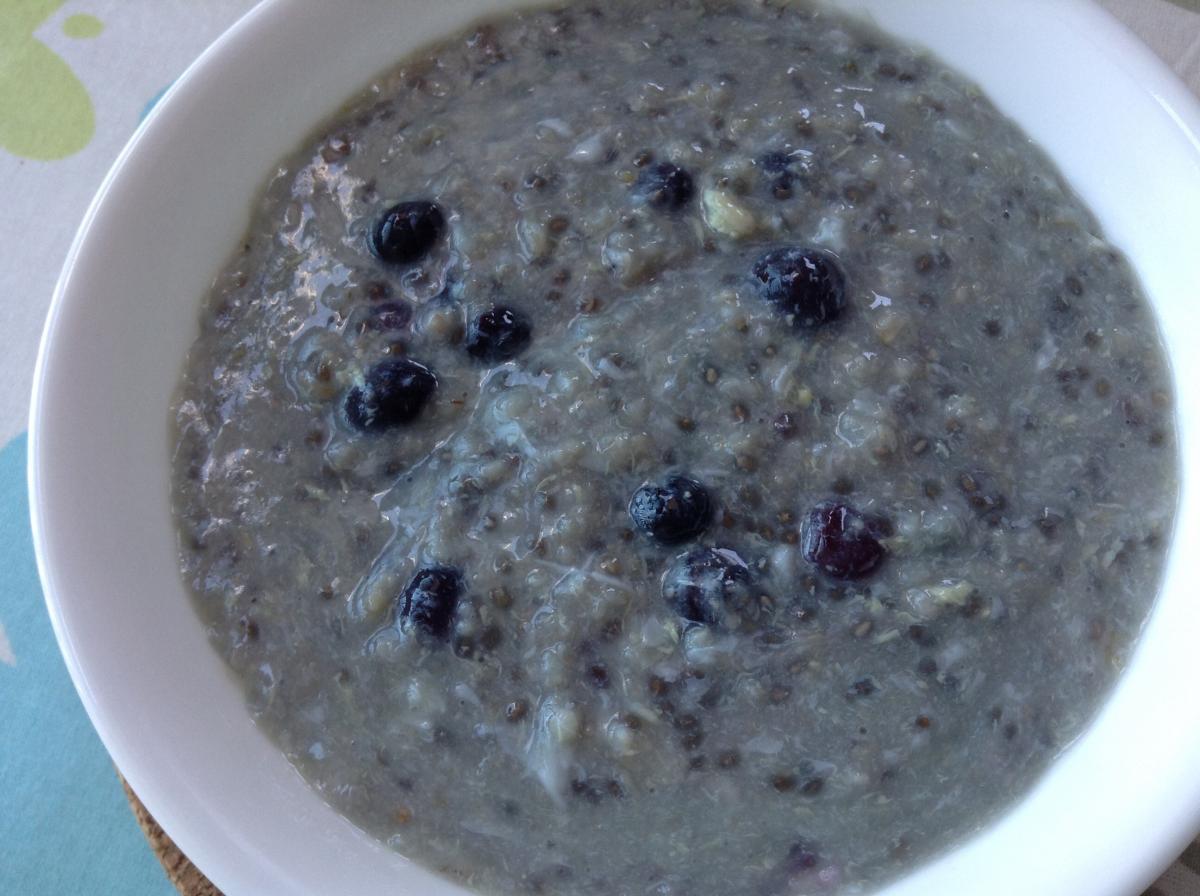
1) Add dry oatmeal and water to pot and boil.
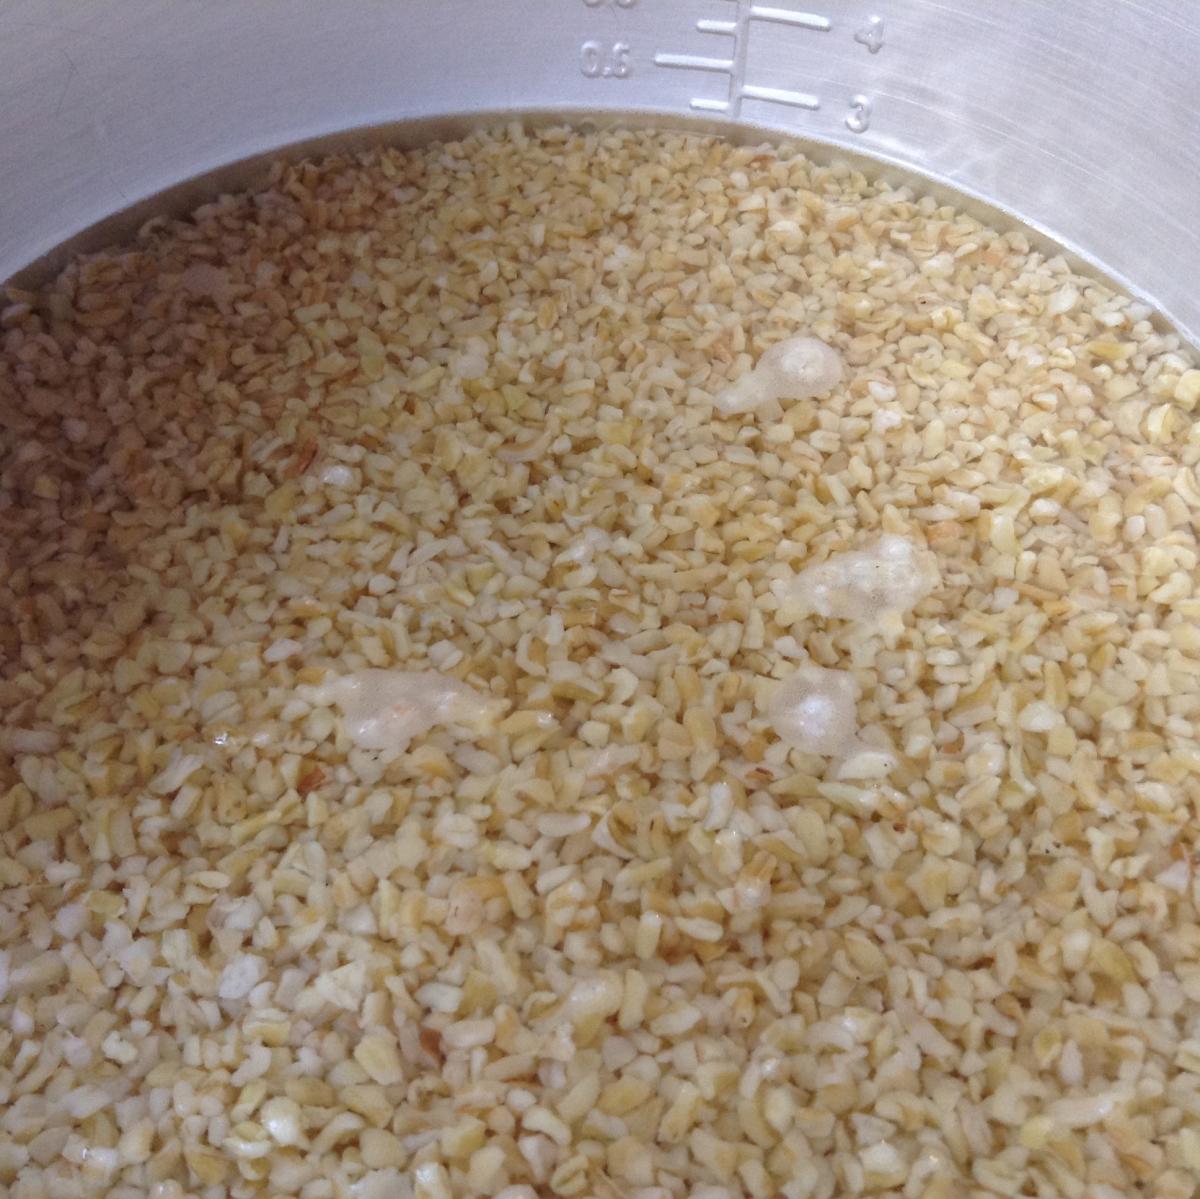
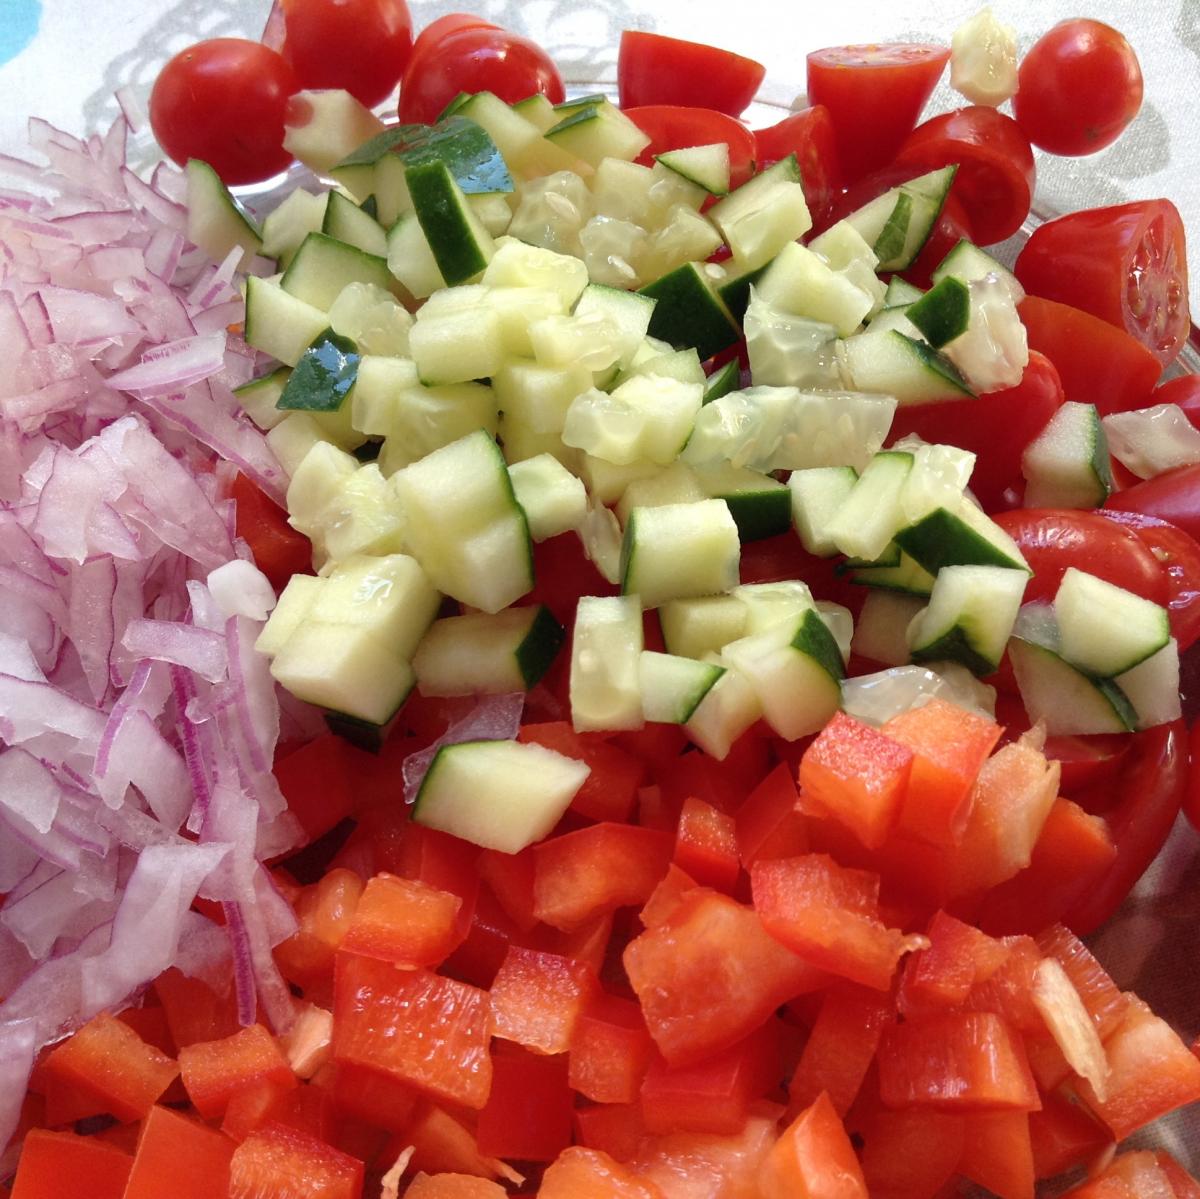
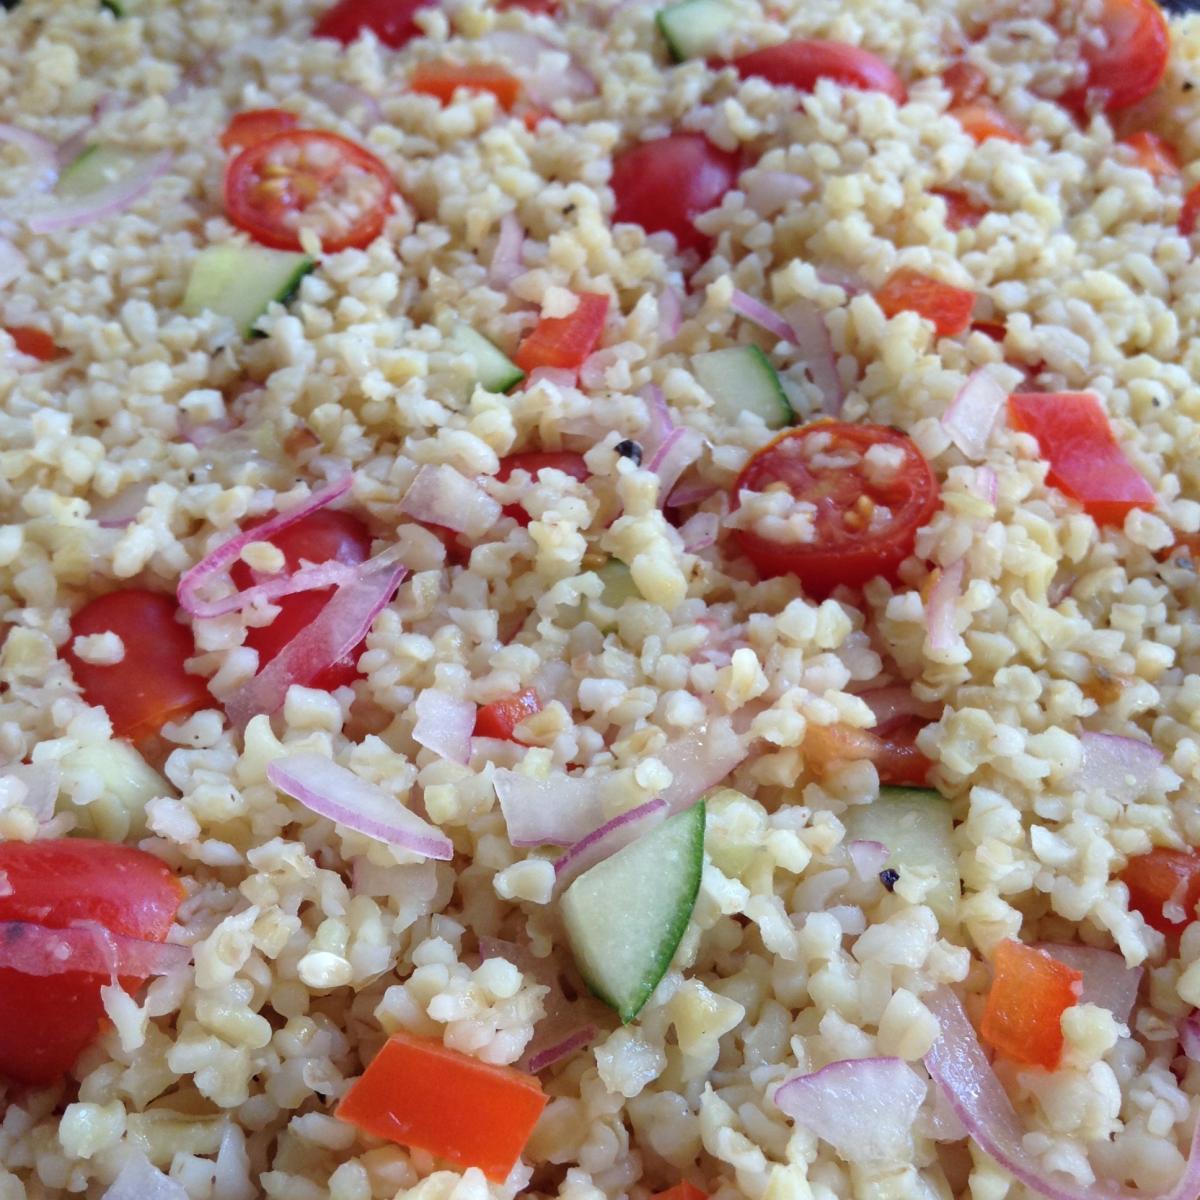
Freekeh Mediterranean Salad
 In looking for healthy grains that are low glycemic, I found freekeh. It's an ancient grain that is readily available at Costco (Village Harvest Organic Freekeh).
An added benefit of this dish is that I have fun saying "I'm eating freeky" :-)
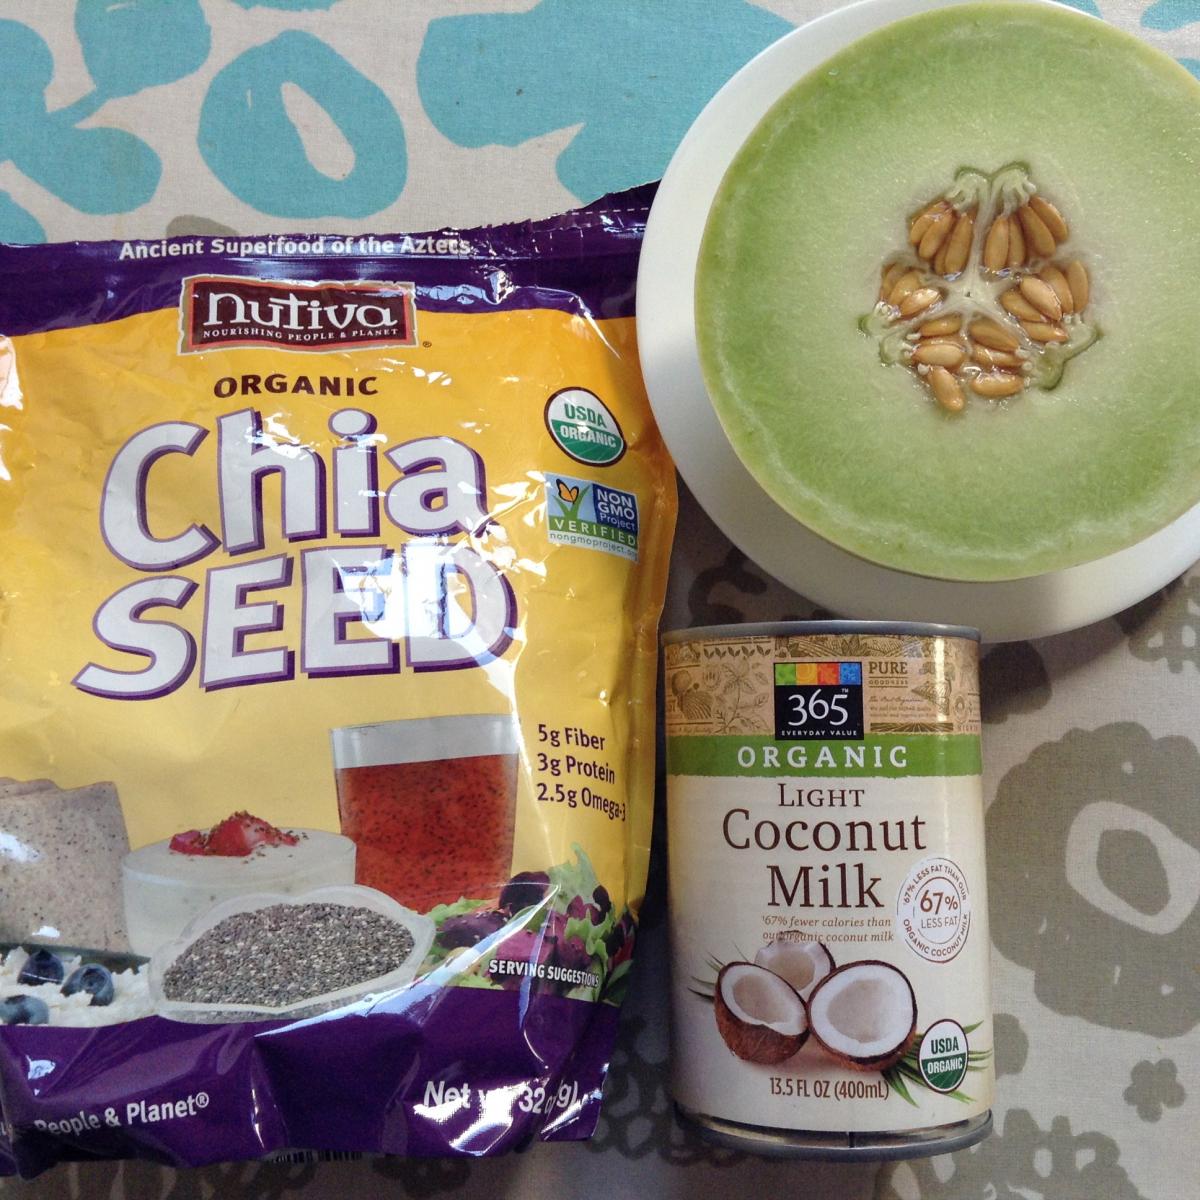
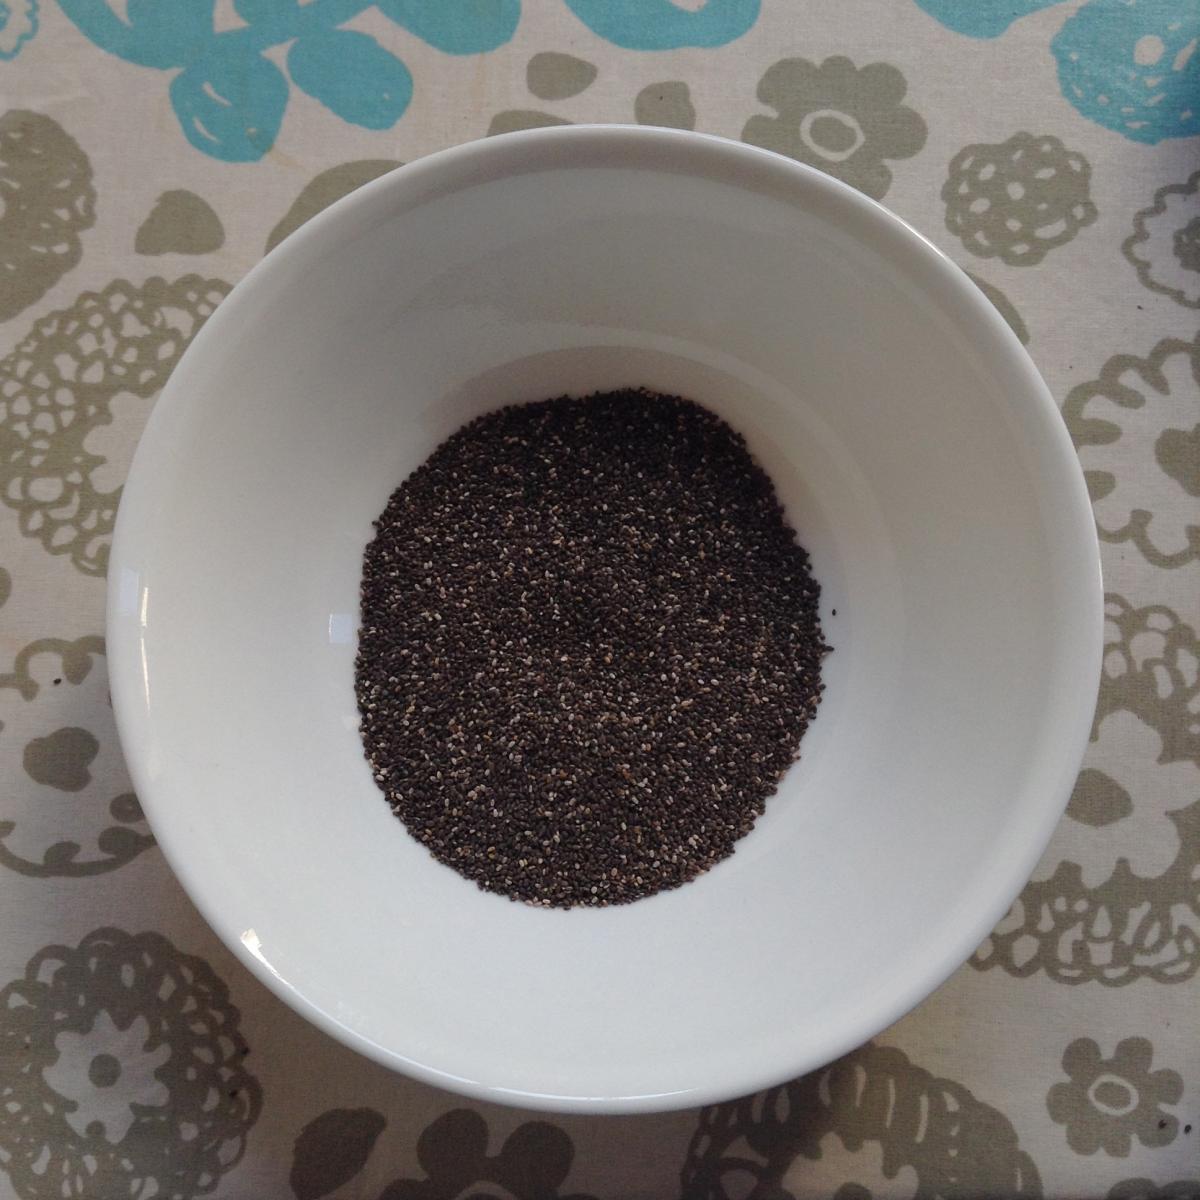
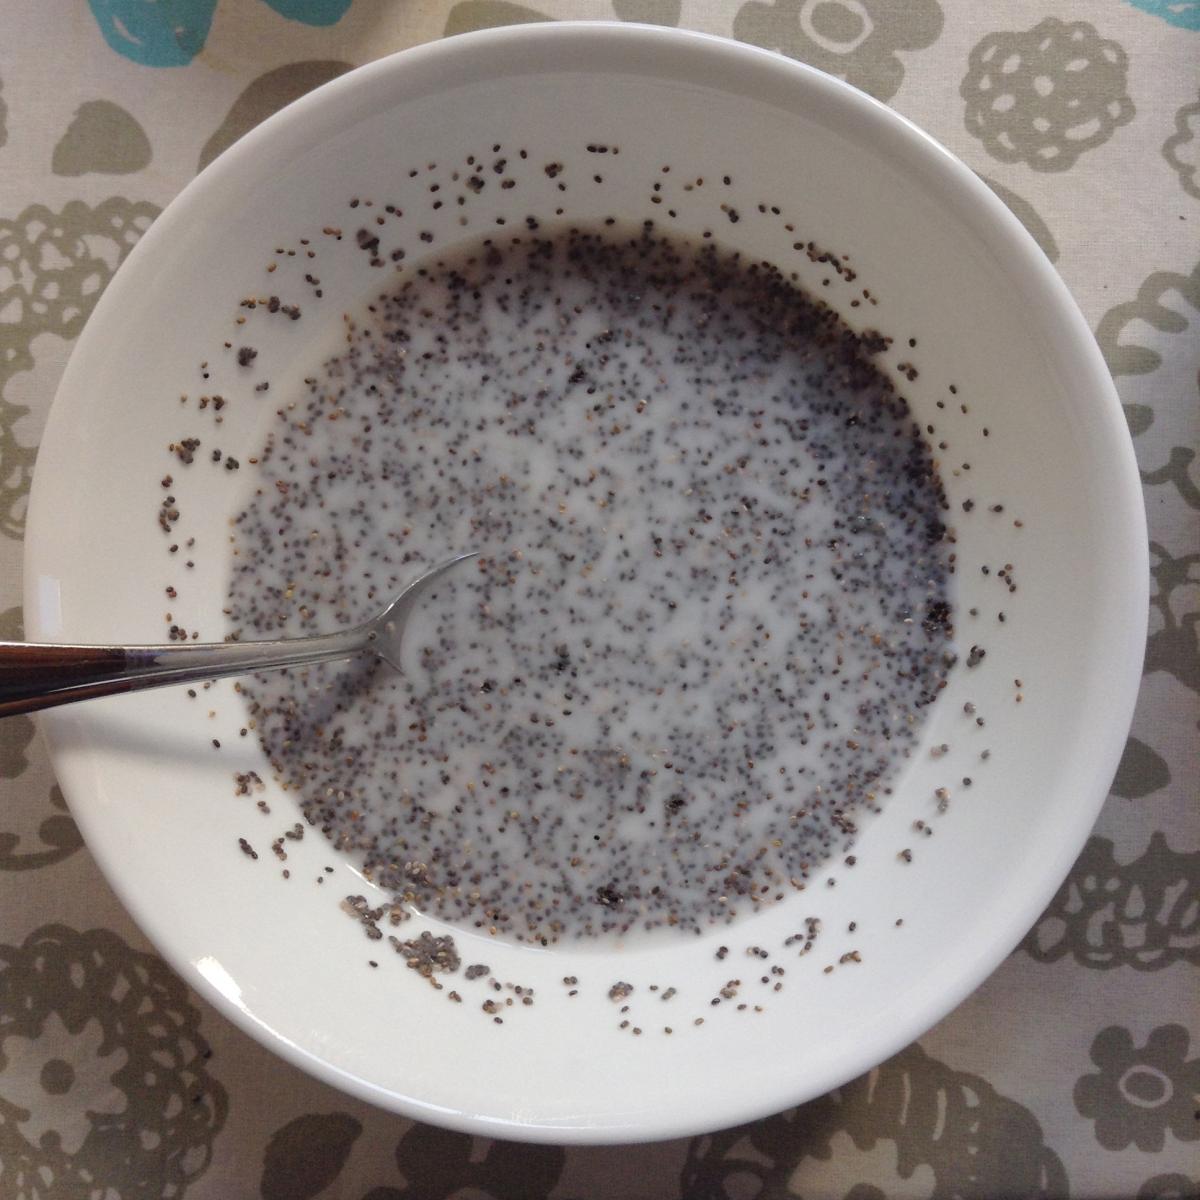
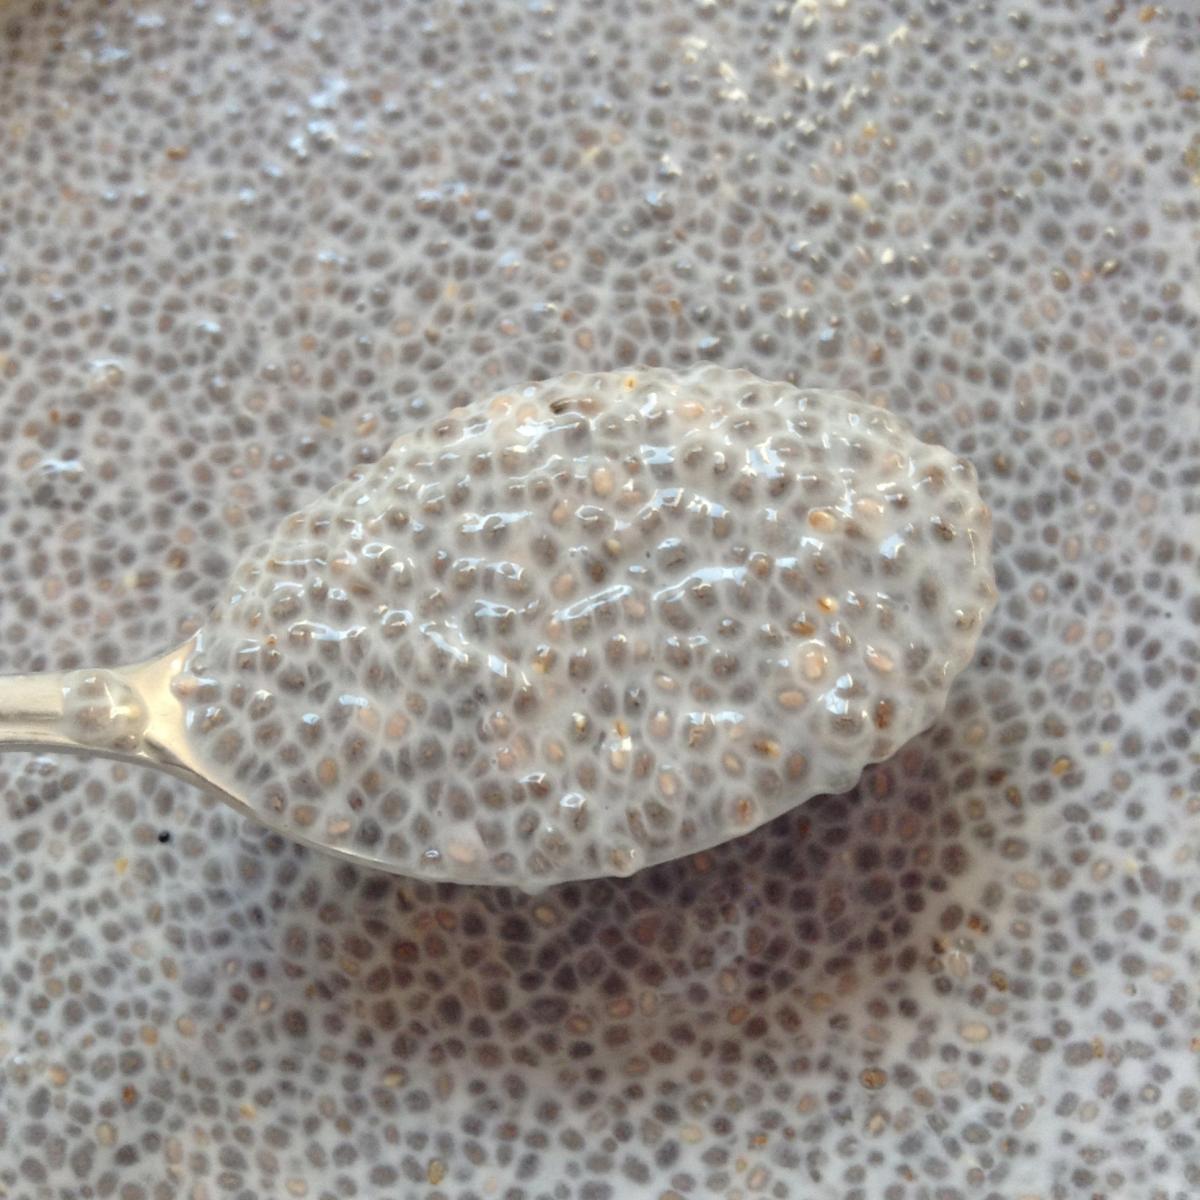
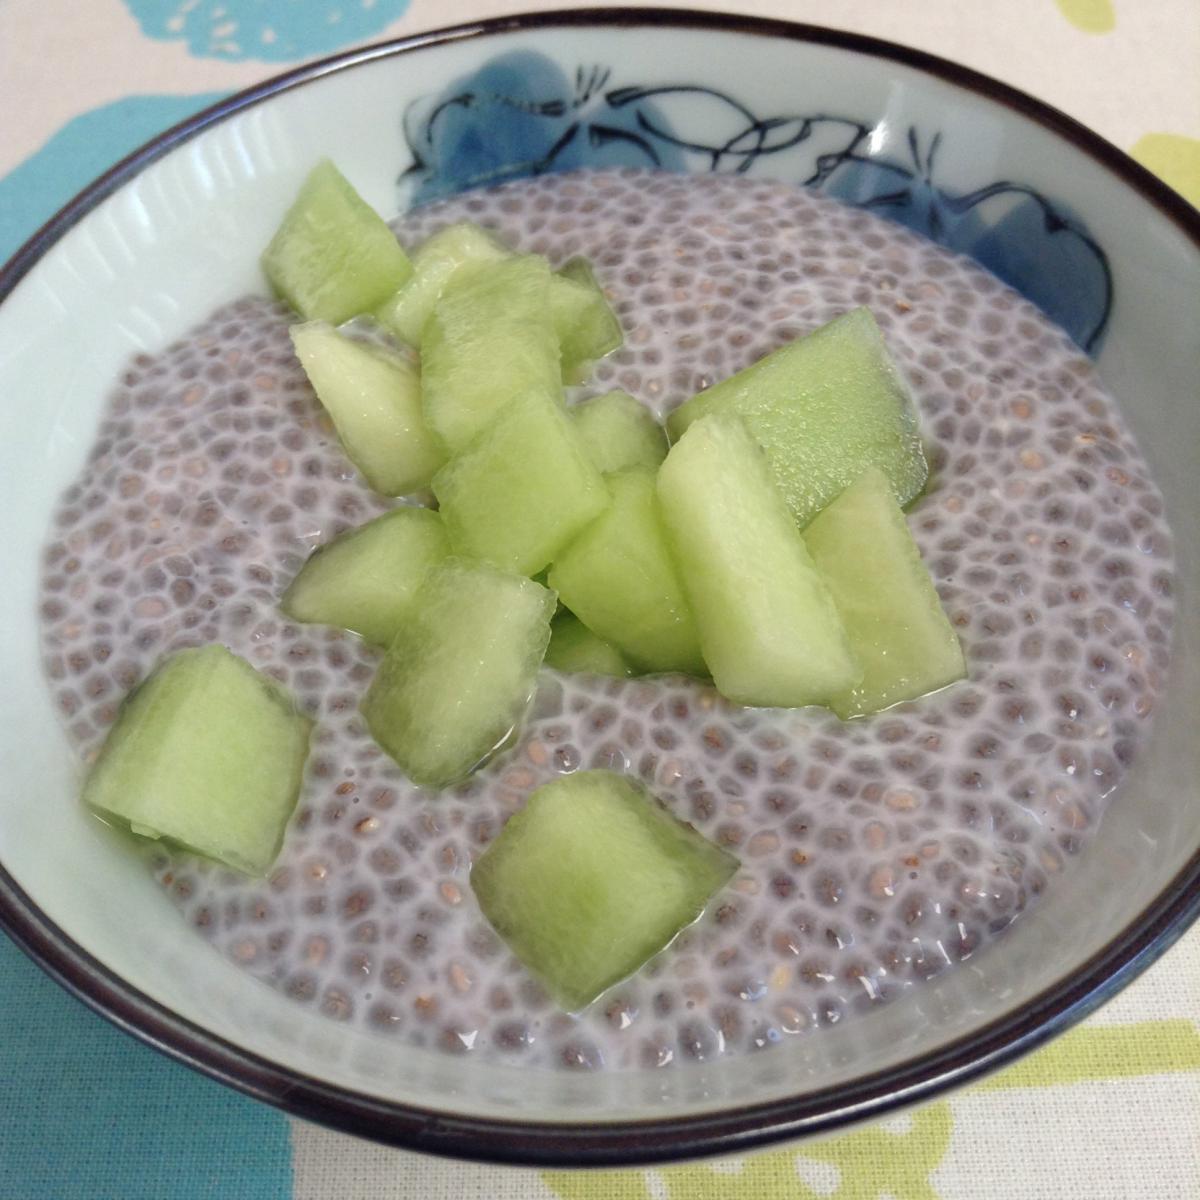
No-Cook Honeydew Coconut Chia Pudding
 A quick and healthy spin to a classic Asian dessert, honeydew coconut pudding.
4 ingredients only and no cooking required!
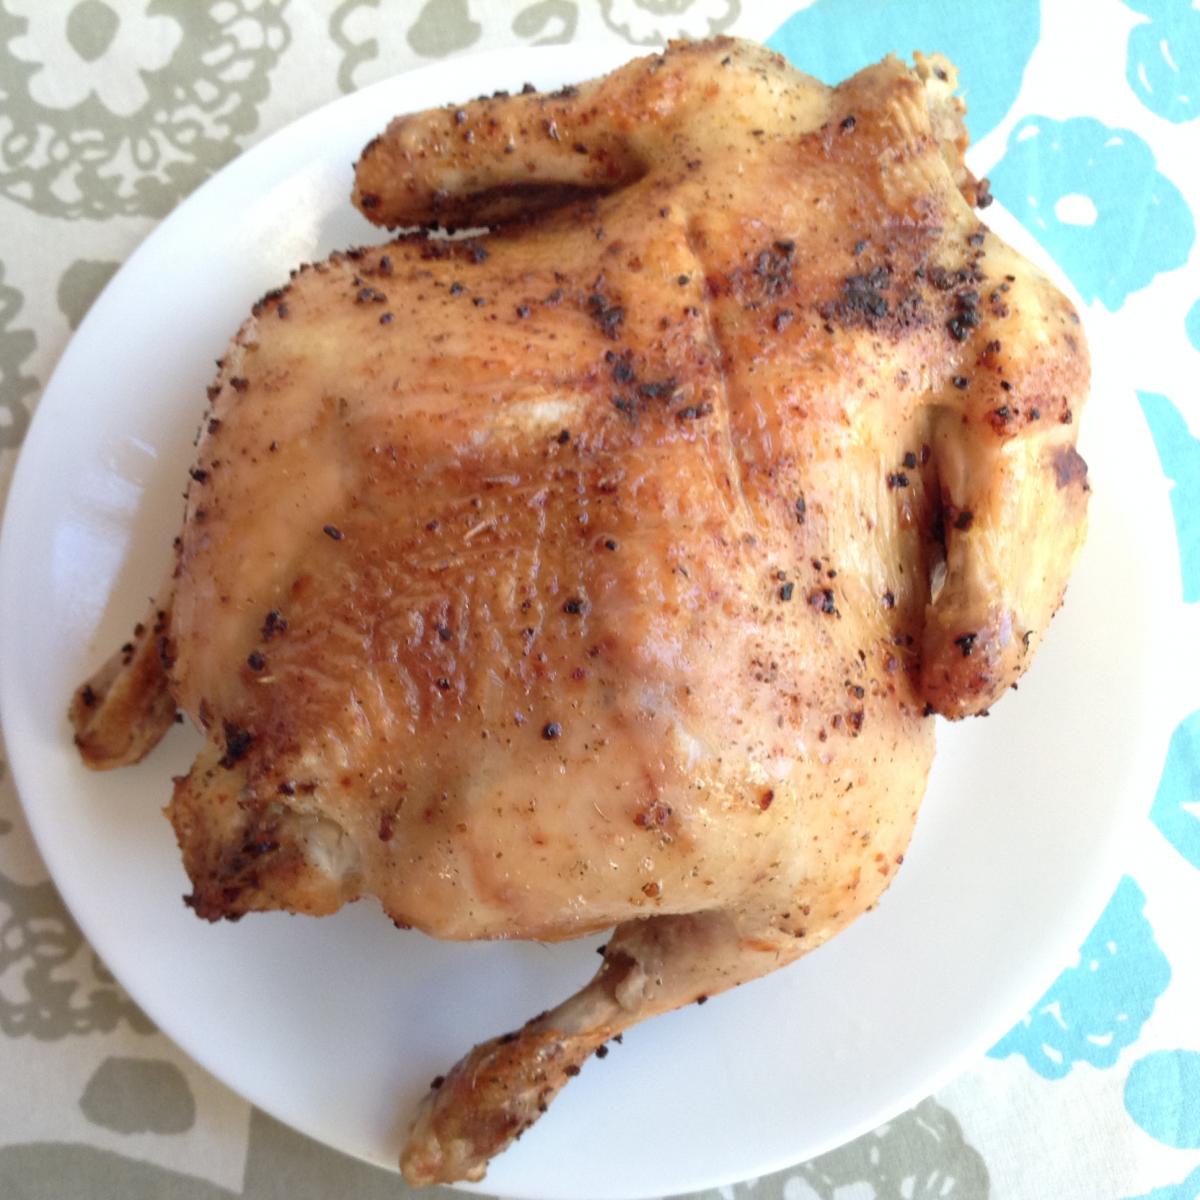
Low Fat Organic Rotisserie Chicken
 This low fat rotisserie chicken is one of my favorite recipes. Not only are whole organic chickens more affordable than other organic meats, this recipe is quick and you can even get a quick chicken broth out of it too! The trick is using the Nuwave oven.
I marinate the chicken with the Kirkland organic seasoning. I run through this seasoning super quick because it goes with all meats and vegetables. It's just a wonderful combination of all the spices you can think of, and it's organic too!
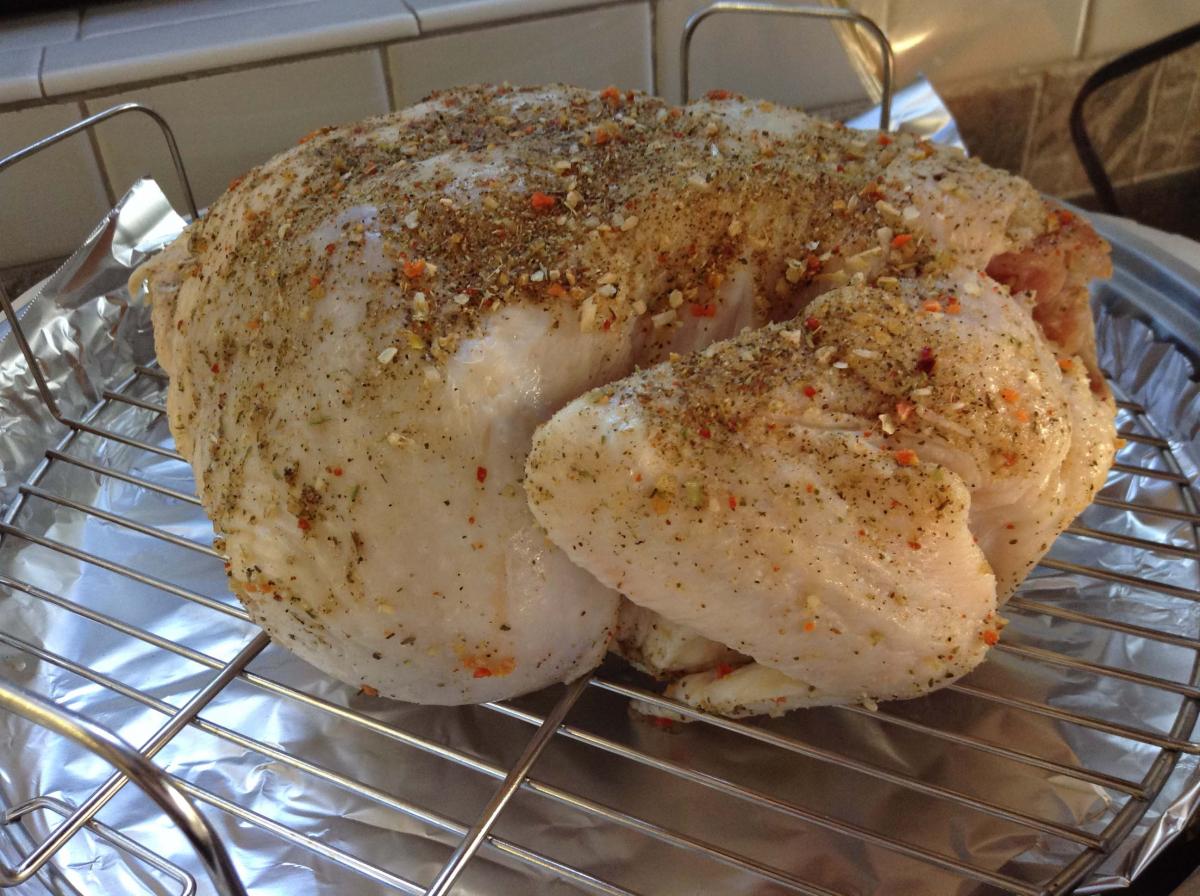
Since I am on a strict low omega 6 diet, I do not eat any of the skin or remaining fat from the chicken. However, sometimes it's very tempting to eat the crispy chicken skin. Even then, I don't feel too bad about eating the skin, as most of the fat has drained away to the bottom of the pan while cooking.
Low Fat Rotisserie Chicken (with optional Chicken Broth)
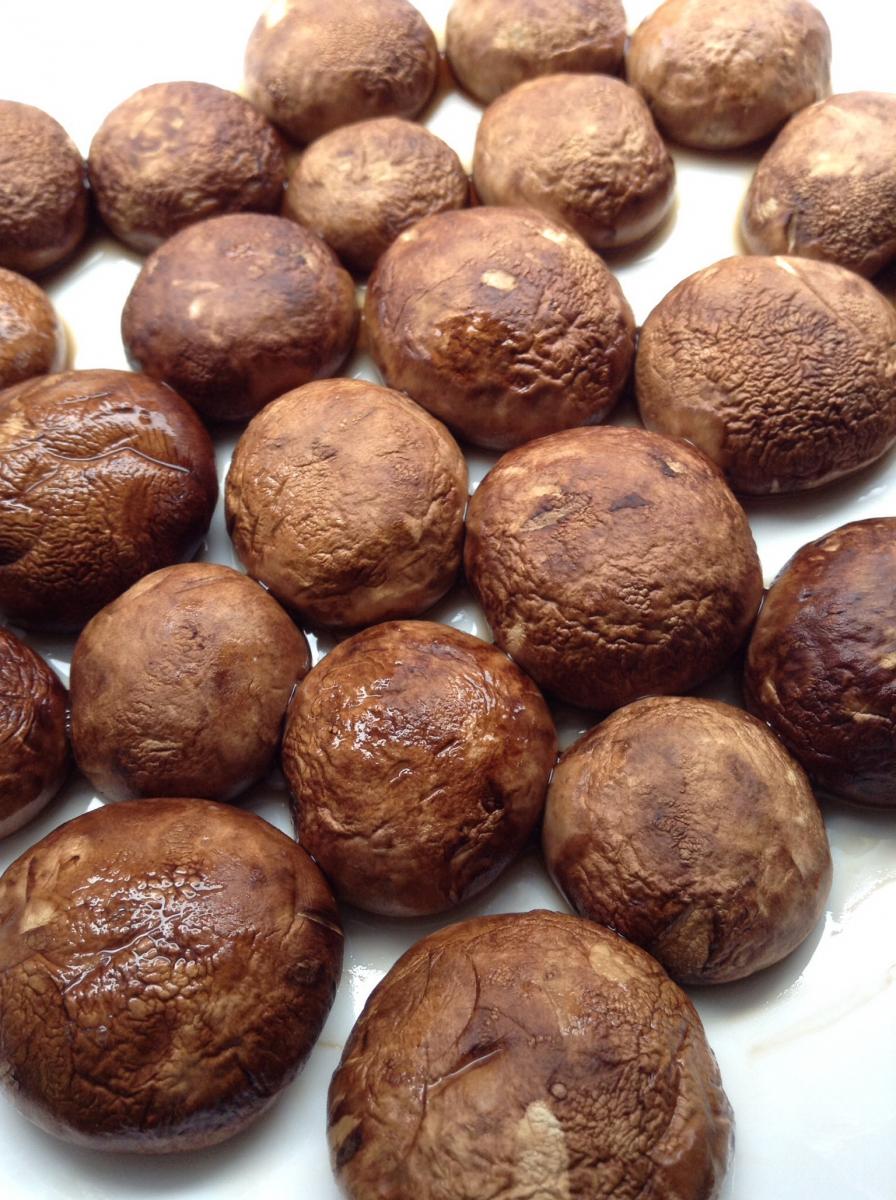
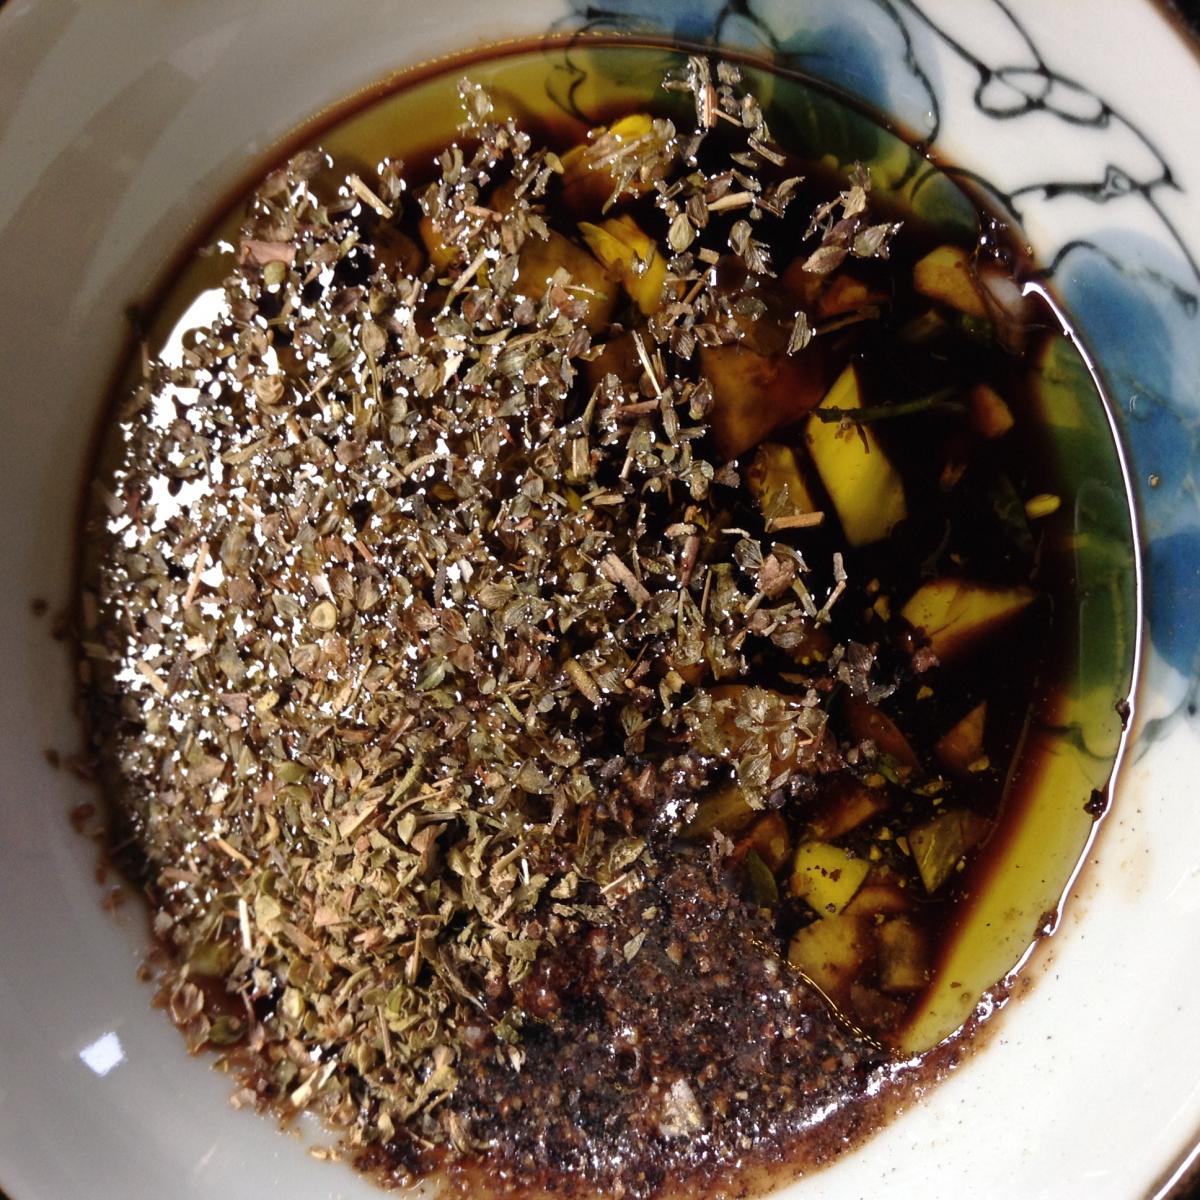
Marinated Mushrooms
 Whenever we go to a salad bar, we always look for marinated mushrooms to add to our salad. The marinated mushrooms add quite a bit of weight and price to our salad! This is until I realized I could make it myself at a fraction of the cost.
Now, I make a batch of these every week! These marinated mushrooms are great on salads, or as a side dish to any meal!


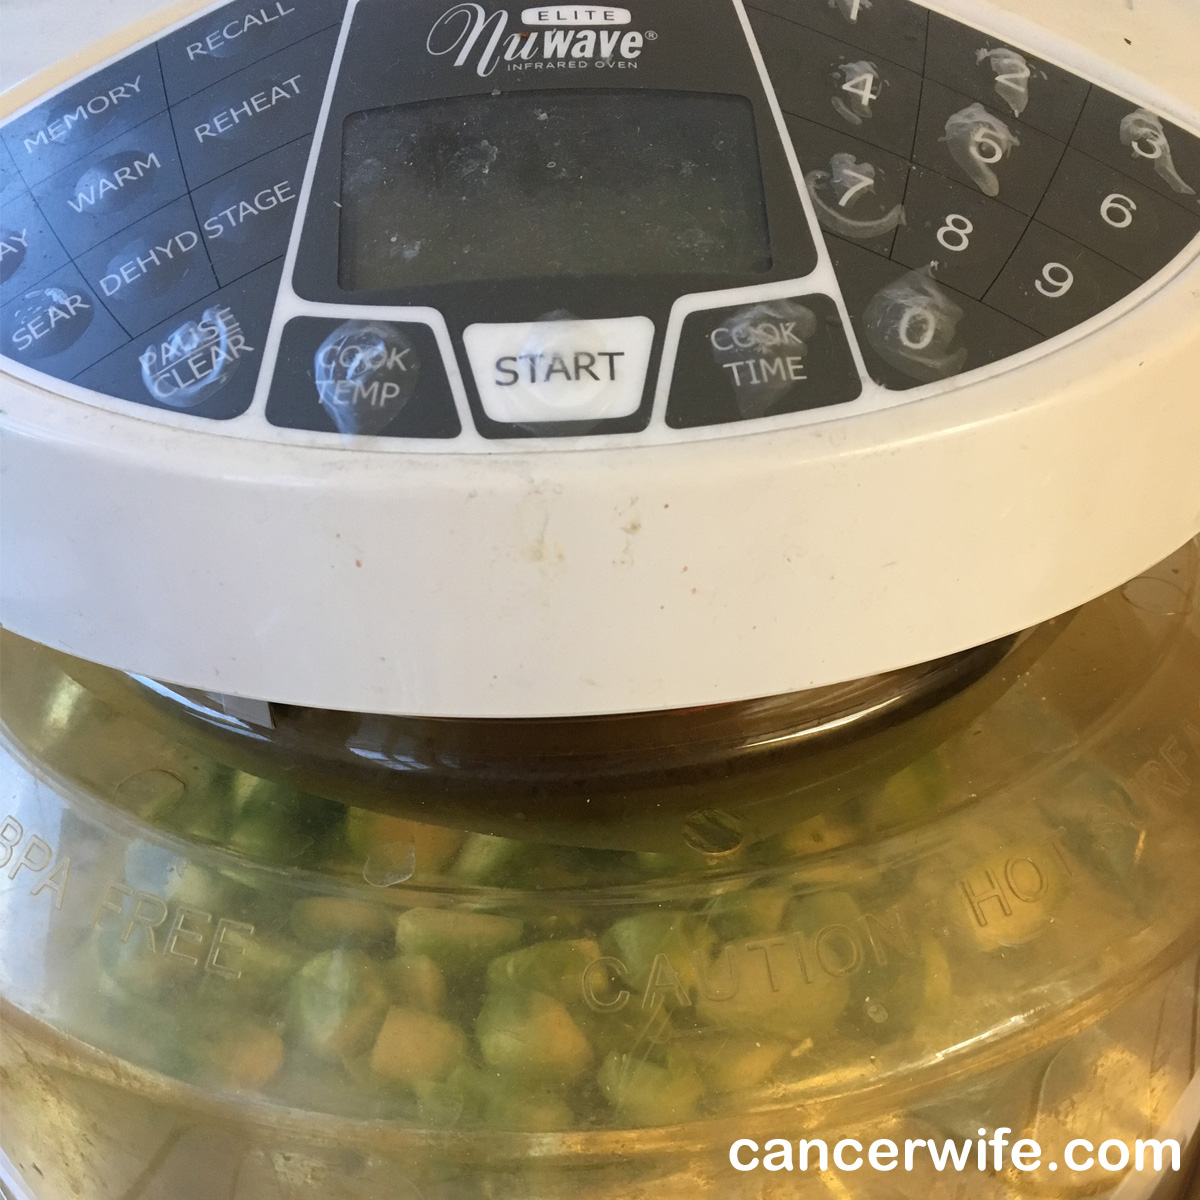
Healthy Eating at Home: Nuwave Oven
 One of the hardest diet regimens that I've been on is the ketogenic diet. This involves cutting down carbohydrates to about 20g carbs a day, and mainly eating protein and fats.
Not only was it difficult with the low blood sugar, but on top of that, I needed to cook a LOT of protein throughout the day! That was when we got a Nuwave oven to help cook all the meat.
The advantage of the Nuwave oven is that it can cook frozen meat without toughening the meat like a microwave does. When I was doing the ketogenic diet, I froze 3oz portions of meat. When I needed to eat, I just put the frozen meat into the Nuwave oven. The cooking time was very fast, usually about 10 minutes, depending on the thickness and portion size.
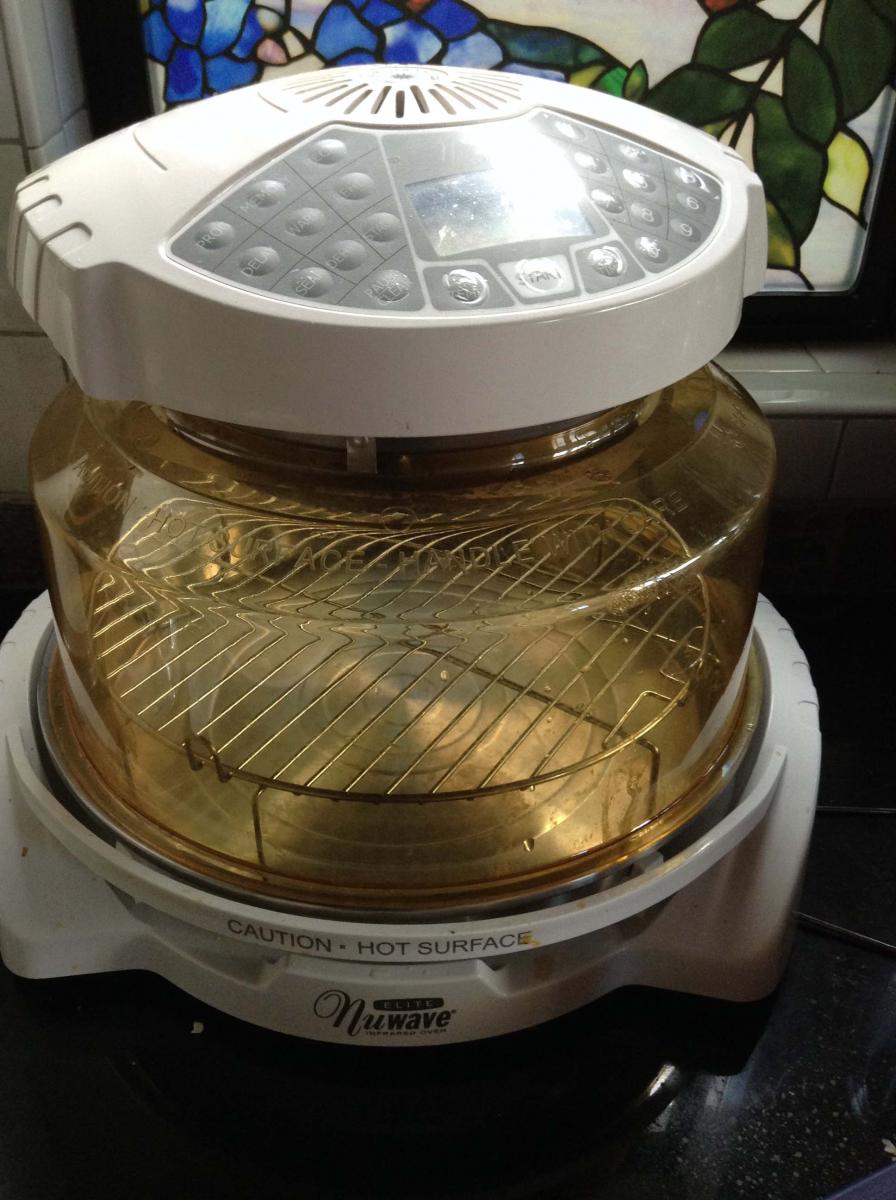
One of our concerns was the Nuwave oven's plastic dome. We would have prefered a glass dome, but that isn't available. The next best thing was to get the Nuwave Elite model, which has a BPA-free plastic dome made from polyphenylsulfone (PPSU). This model is more expensive than the usual Nuwave oven that is touted on the infomercials. With shipping and handling, it costs about $150. If you have a regular Nuwave oven, you can buy the BPA-free plastic dome separately, it's called the "Power Dome", for about $50.
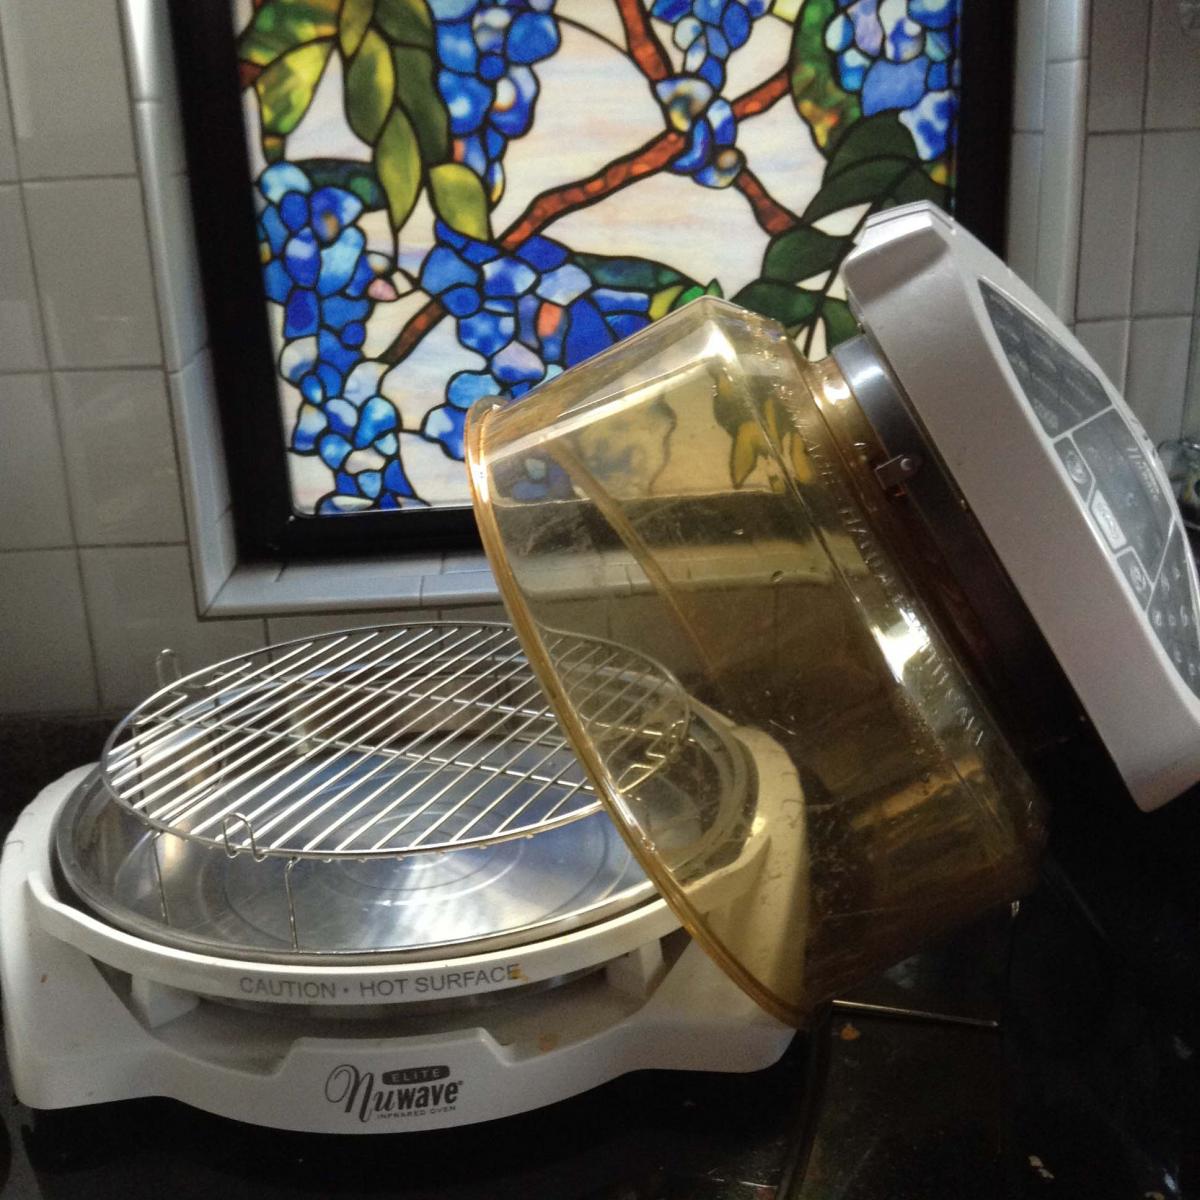
I am not on the ketogenic diet anymore, but the Nuwave oven is still my trusted kitchen tool. On the low omega 6 diet, I need to eat low fat.
The Nuwave oven is also perfect for this, as the oils drain off the rack and collect in the pan below. I like to line the pan with foil for easy clean up. Then the pan, metal rack and plastic dome can all be placed in the dishwasher.
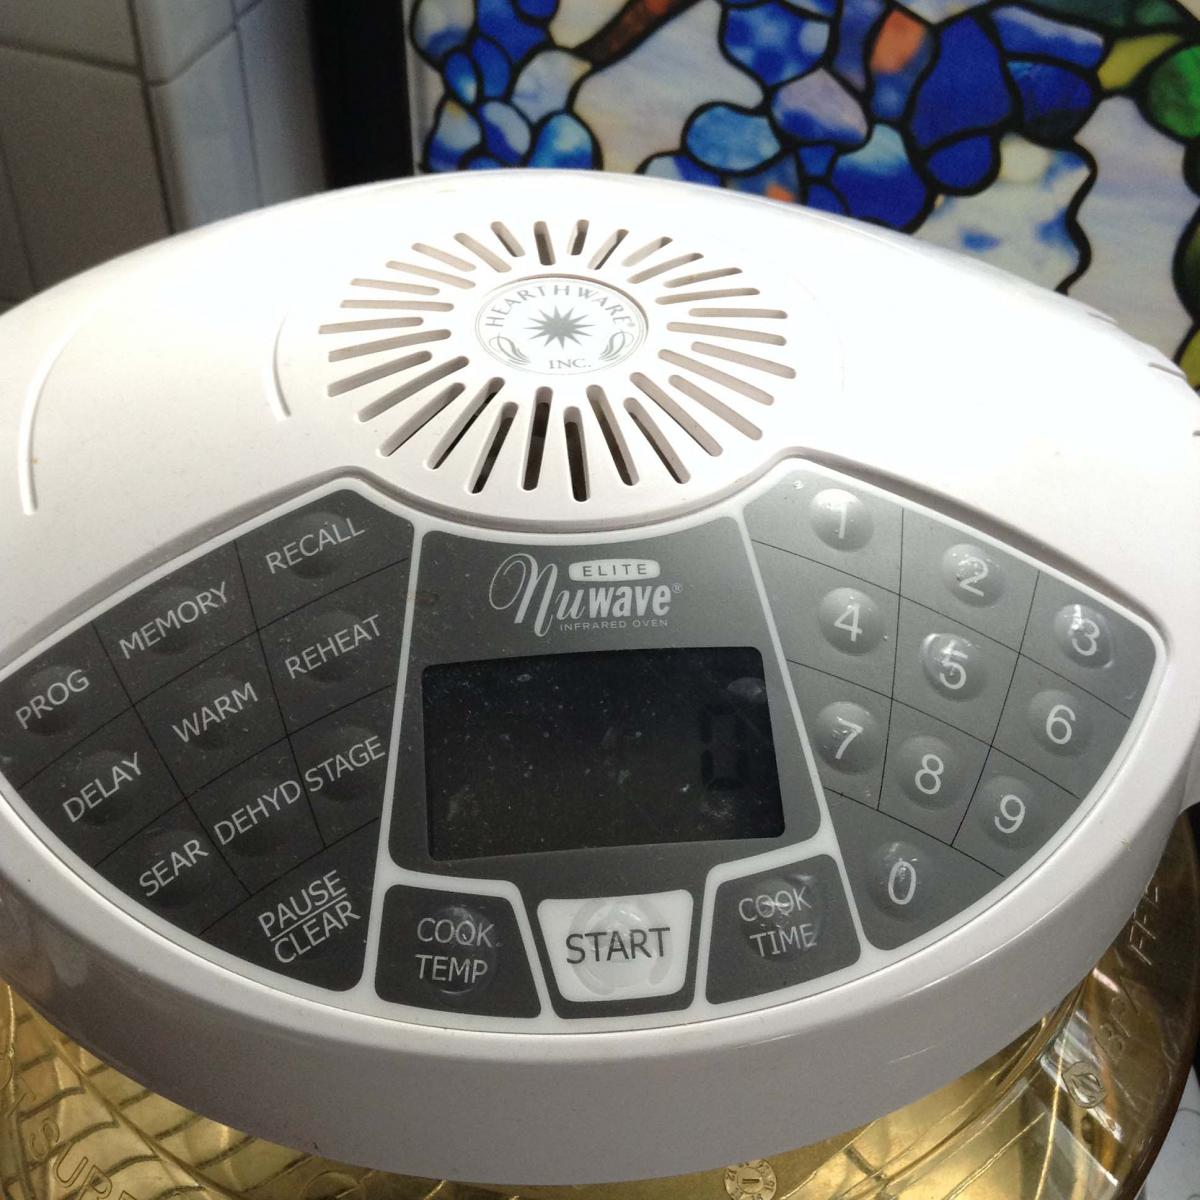
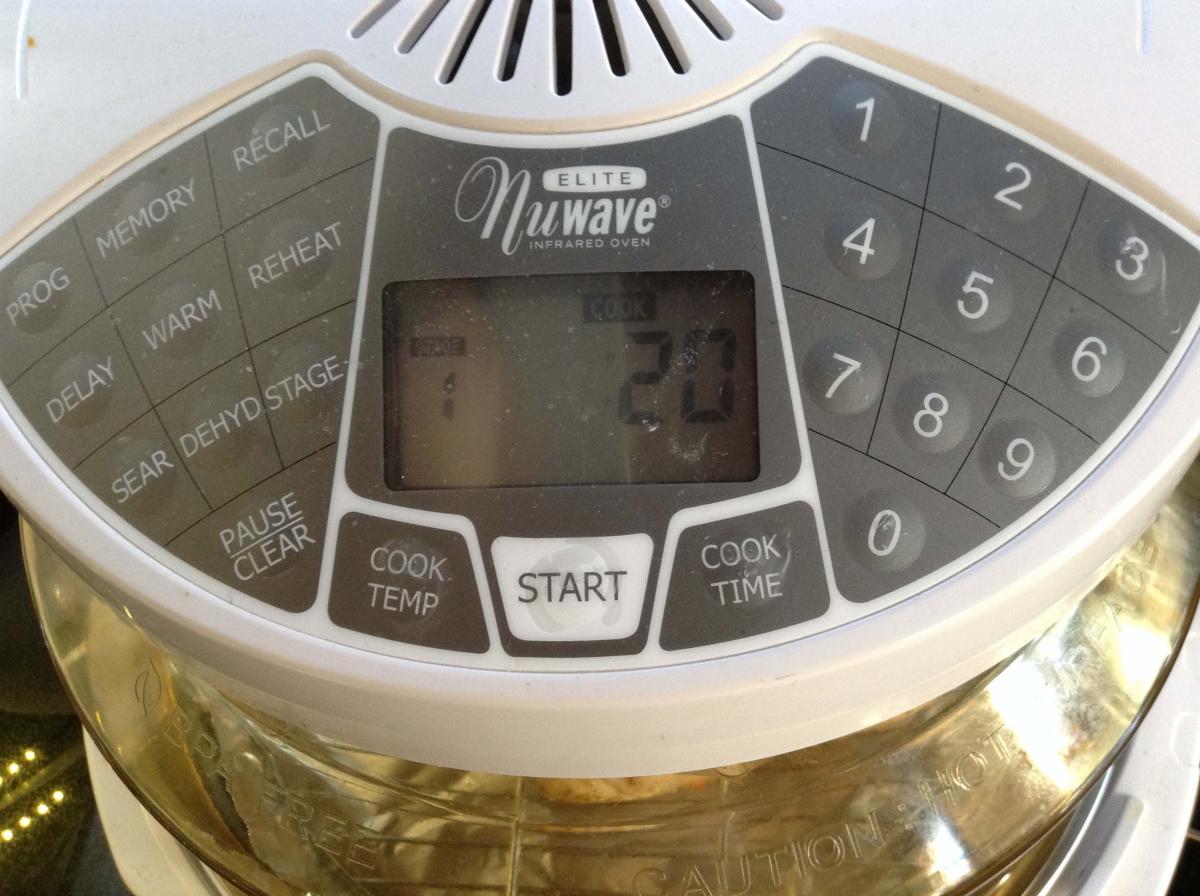
To use the Nuwave oven, you press the "Cook Temp" button, then punch in the temperature. Then press the "Cook Time" button, followed by the number of minutes you want to cook it at. Press the "Start" button, and let it cook! It will beep when it is finished cooking. When cooking meat with the Nuwave oven, you need to flip the meat to the other side and cook, then you're done!
I've made rotisserie chicken, marinated mushrooms, brussel sprouts, meatloaf, even chocolate chip cookies in the Nuwave oven! Give these Nuwave recipes a try!


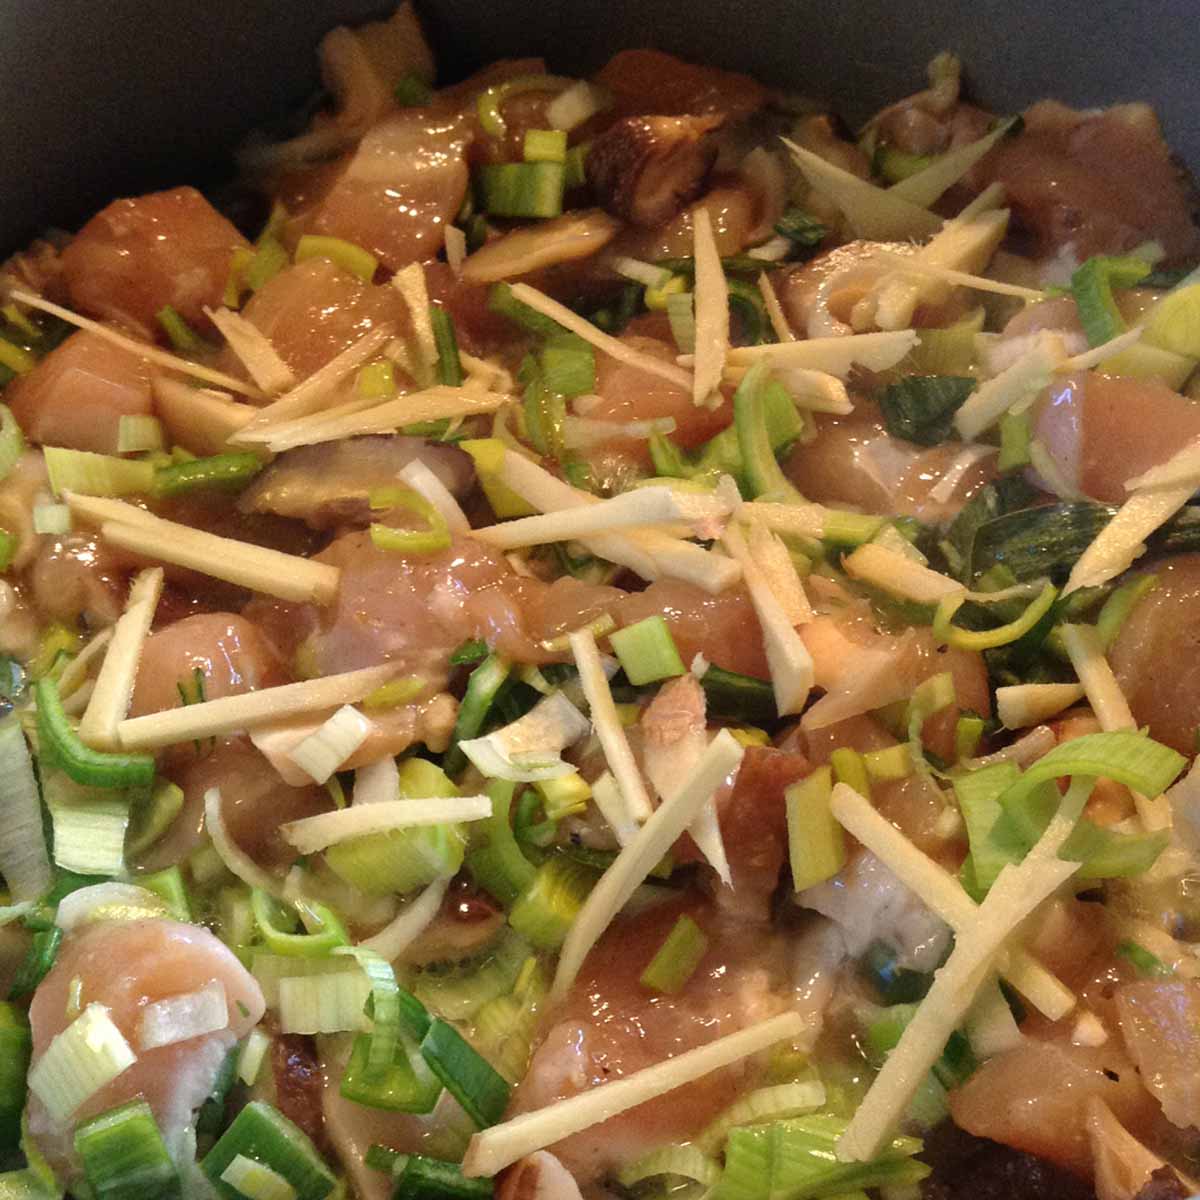
One Pot Rice Cooker Shitake Chicken Rice
 This is my comfort food - succulent chicken over rice, with the umami of shitake mushrooms and a hint of spice from the ginger.
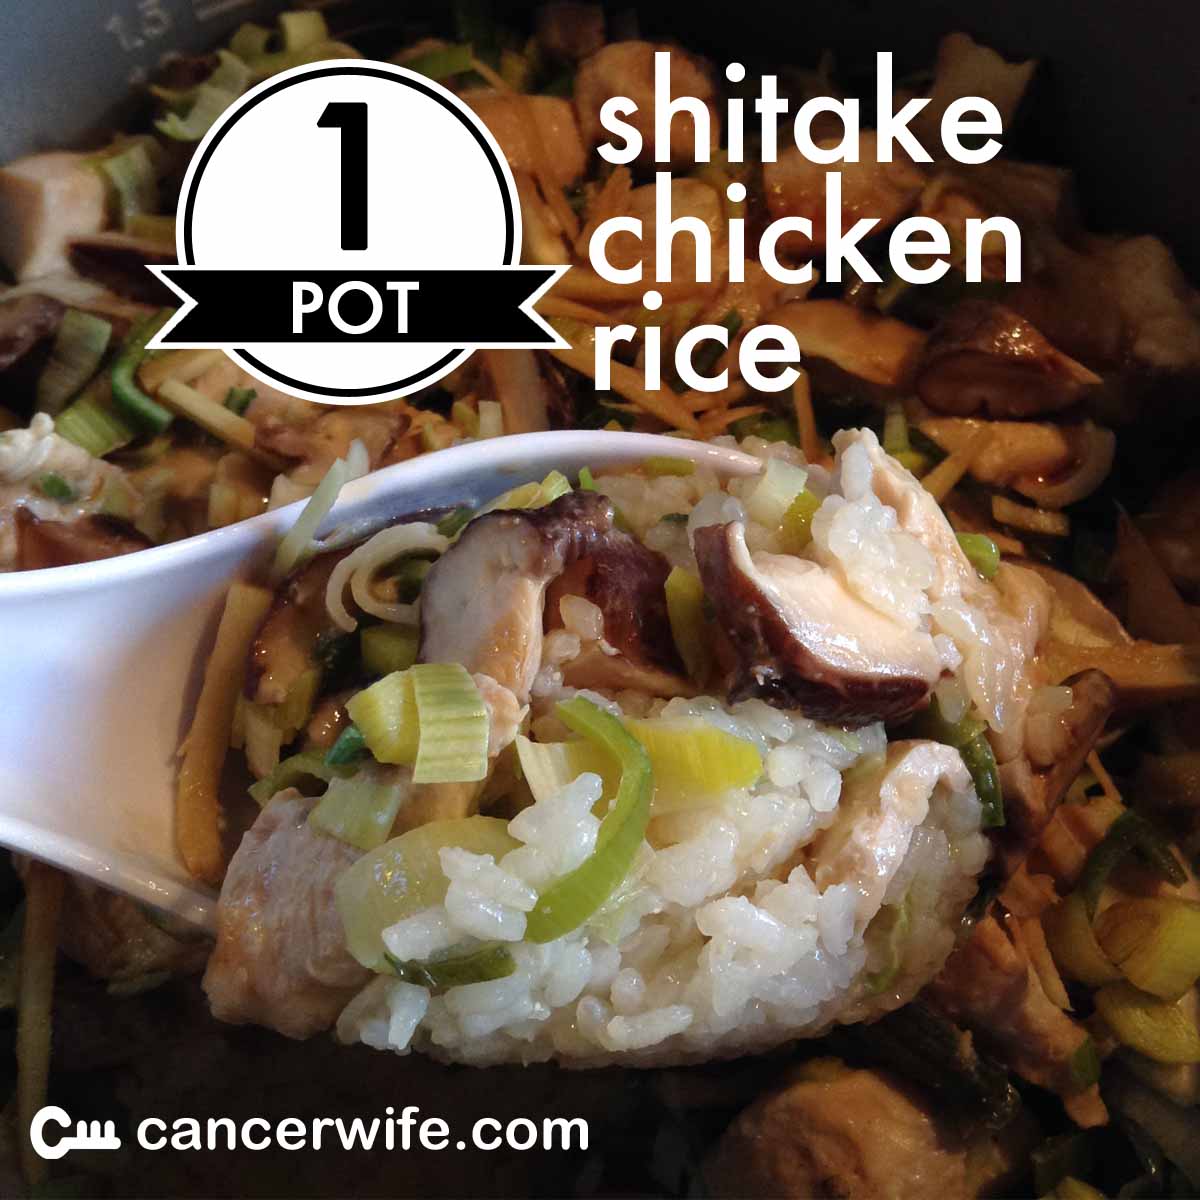
This is a low fat recipe using organic chicken breast. The chicken will be tastier if it's left to marinade in the refrigerator overnight.
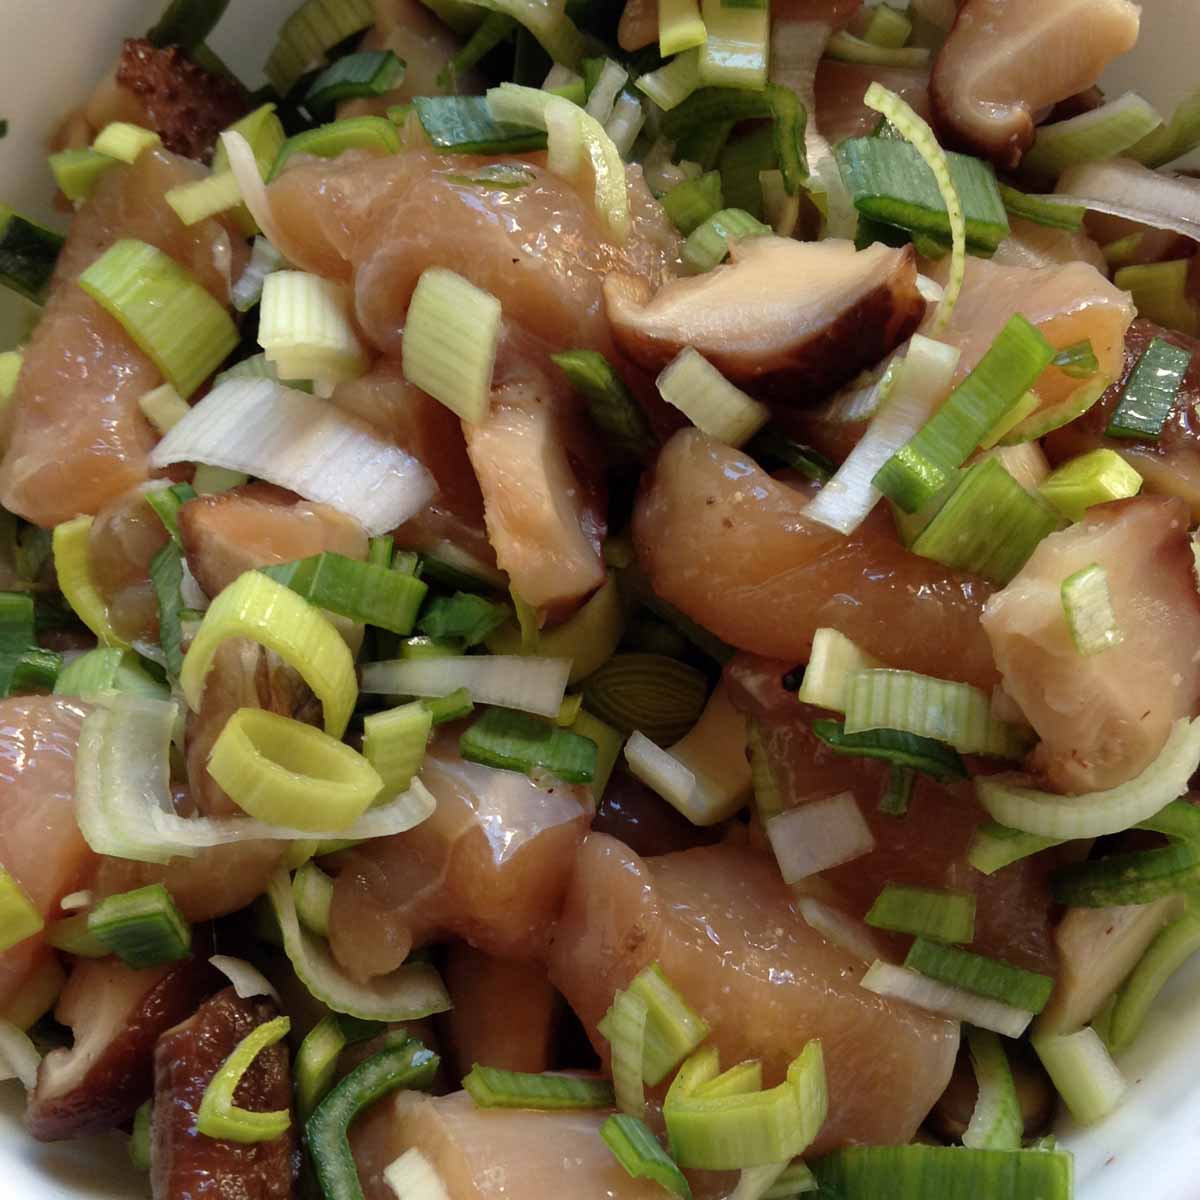
The key to this recipe is to cook the rice in the rice cooker and then before the rice is fully cooked, to put the other raw ingredients in. Cooking the rice in chicken broth gives the rice more flavor.
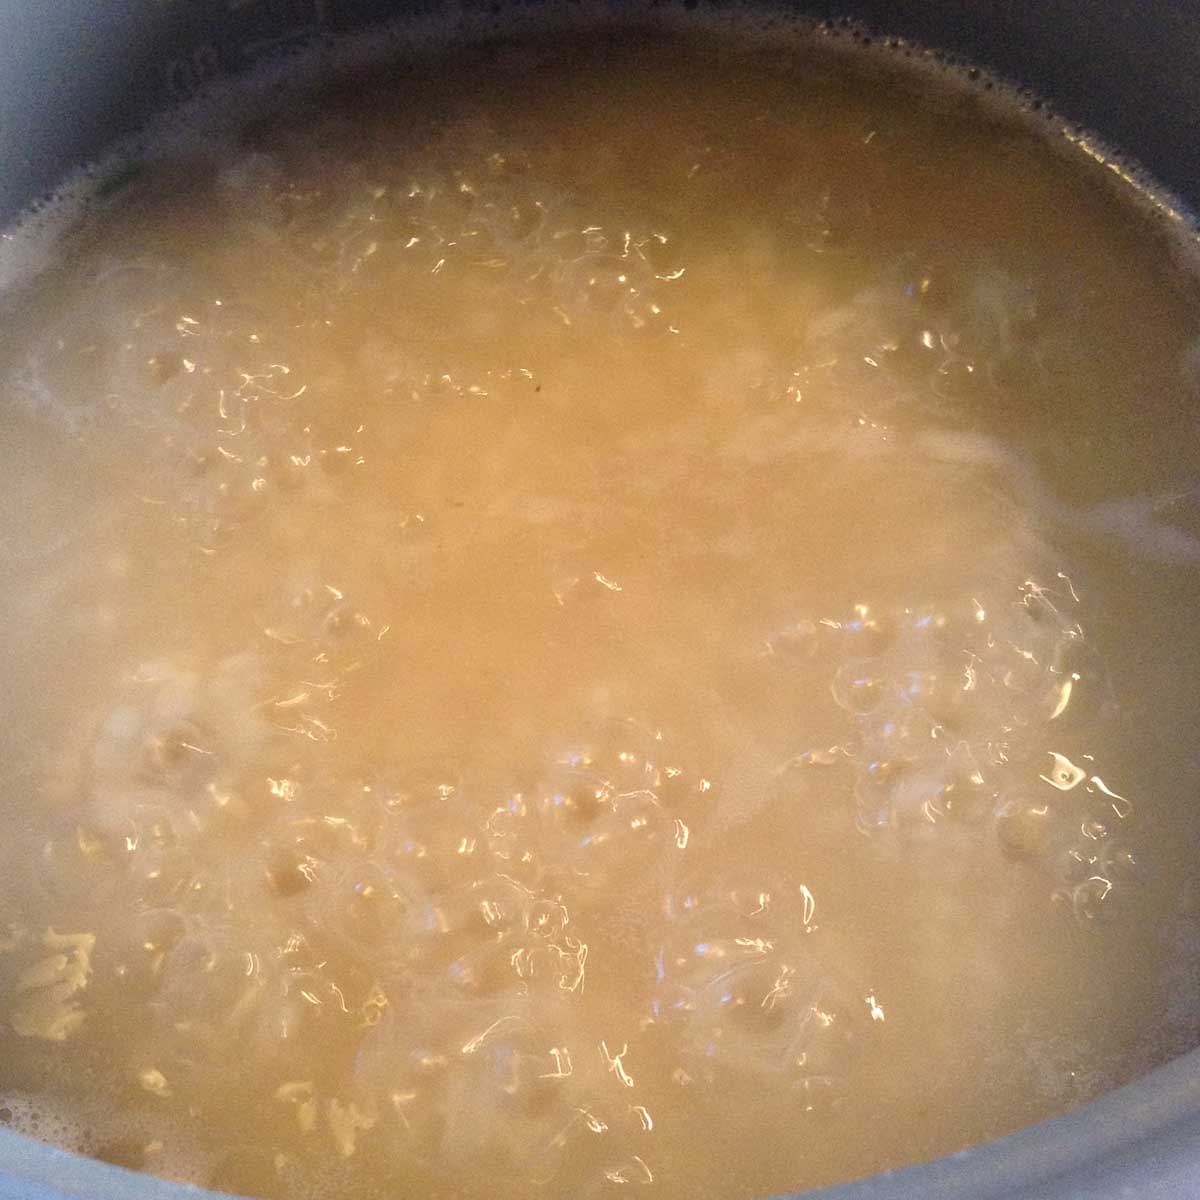
The raw chicken, shitake mushrooms, leeks and ginger are gently placed on top of the bubbling rice, and the lid is immediately closed to let the raw ingredients cook. The juices of the chicken and mushrooms permeate the rice, making this one of my favorites!
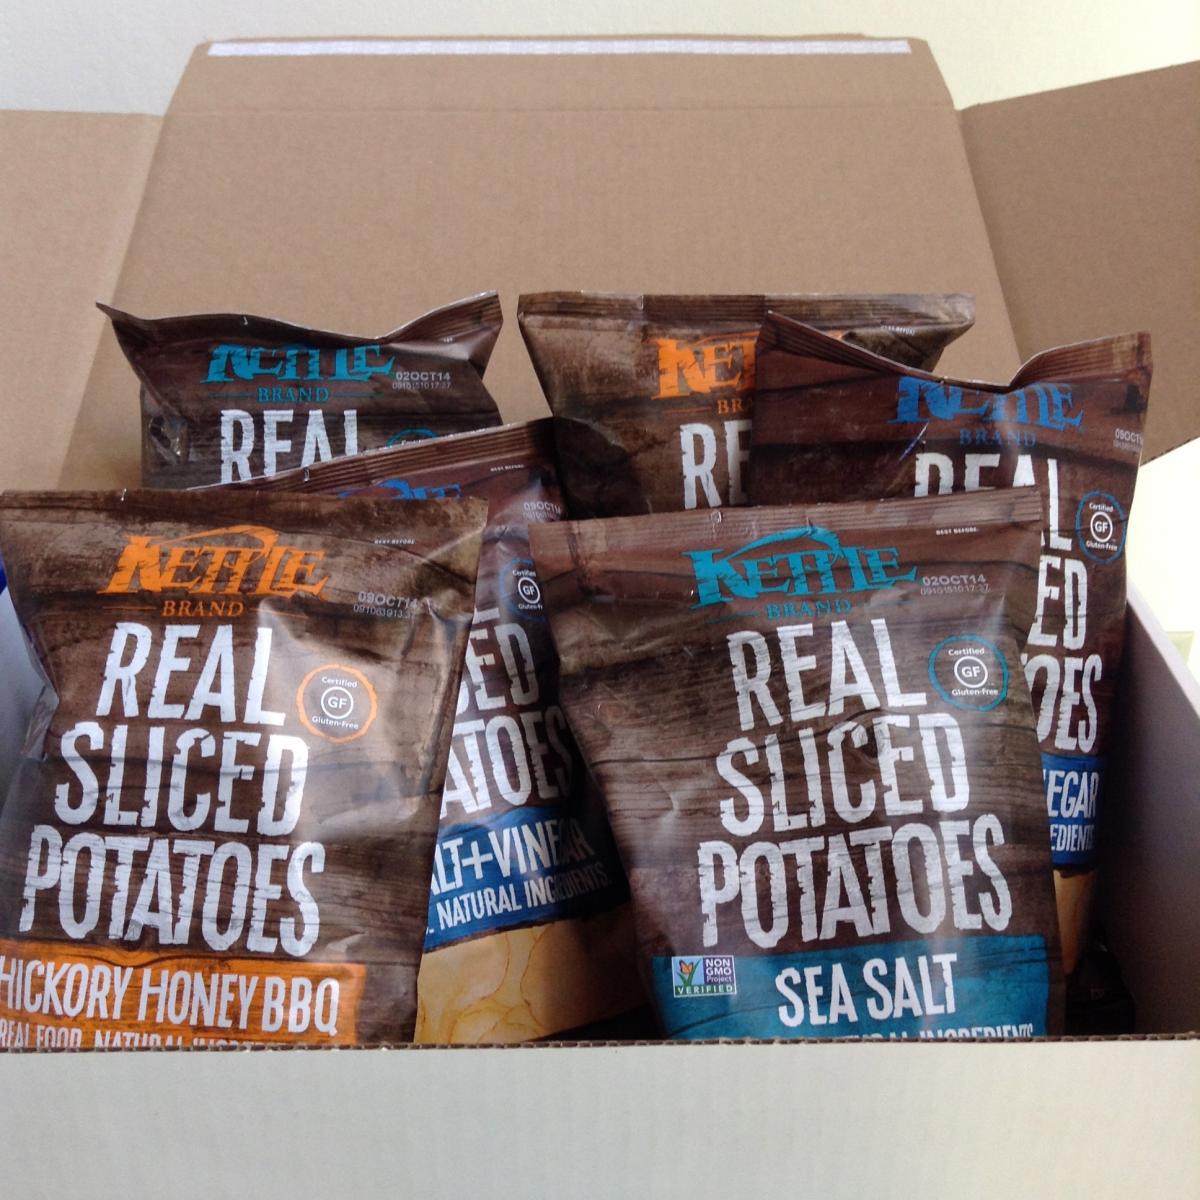
Healthy Snacking: Kettle Chips Real Sliced Potatoes
 Potato chips are one of my guilty pleasures. When I started the low omega 6 diet, I realized that most of the chips have a ton of omega 6 fats.
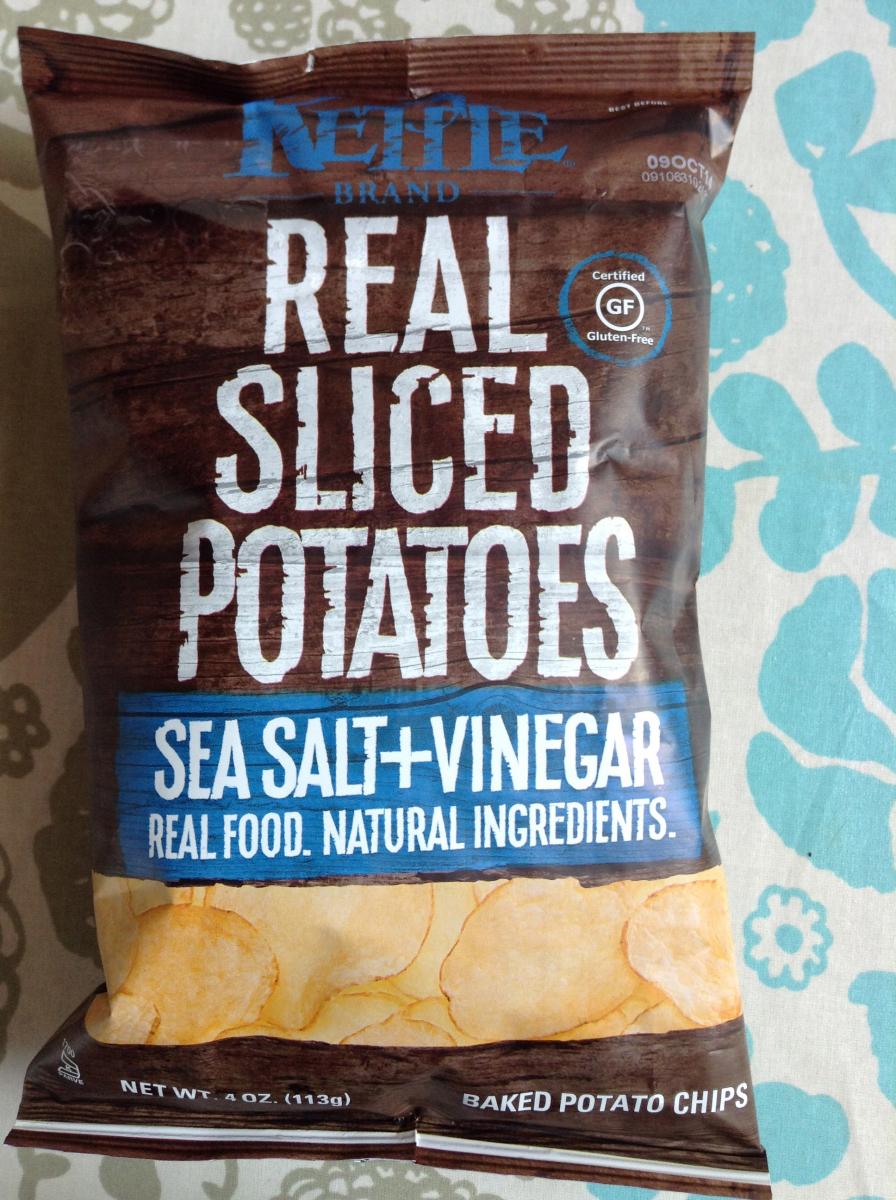
The omega 6 content is much lower than other chips because these chips are baked with less oil.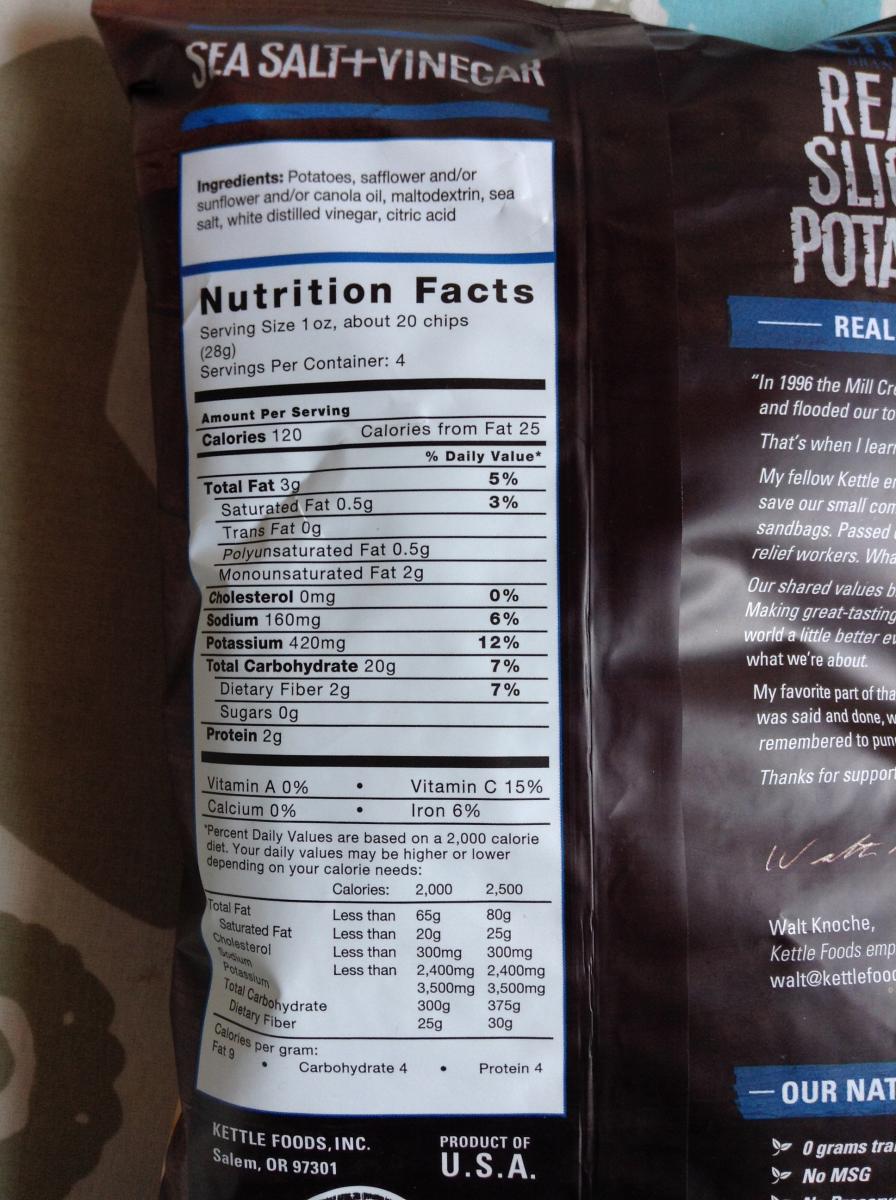
To figure out the omega 6 content, I look at the Polyunsaturated Fats, which consists of omega 3 and omega 6.
Then I look at the oils used for these chips. Sunflower, safflower and canola have negligible amounts of omega 3 compared to omega 6 (Nutrition Facts for Low Omega 6 Diet). So I assume all of the Polyunsaturated Fats are Omega 6 oils.
For comparison -
18 slices Lay’s Potato chips (1oz) = 8.5g Omega 6
20 slices Kettle brand Real Sliced Potatoes (1oz) = 0.5g Omega 6
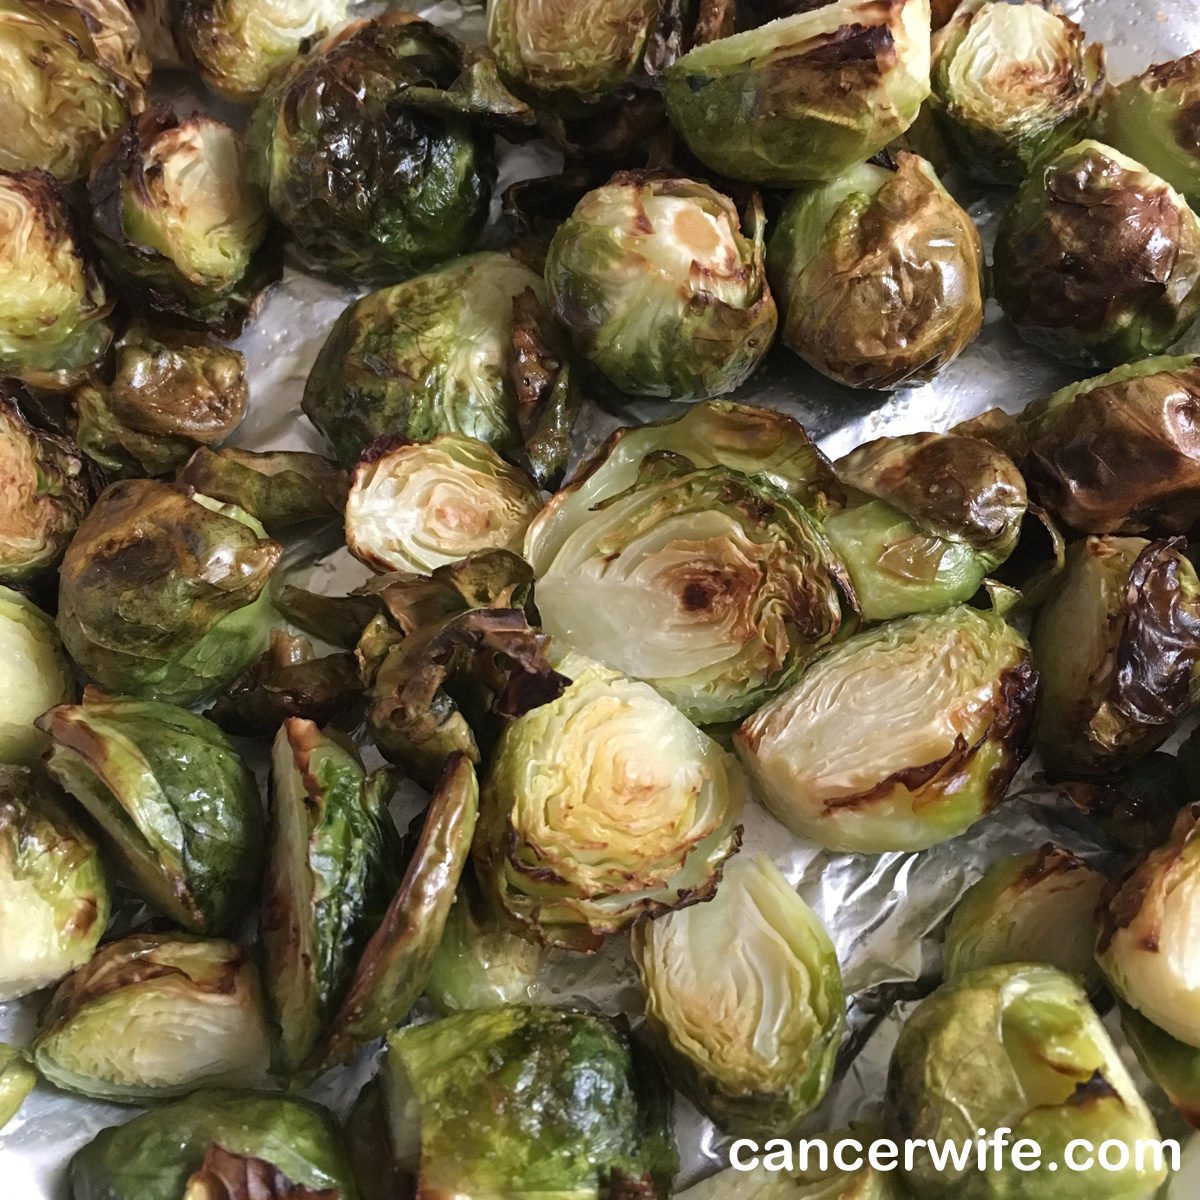
Roasted Brussel Sprouts (Nuwave Oven)
 The nutty flavor and crispiness that comes from roasting the brussel sprouts makes this a well-loved dish for adults and kids alike!
It's super easy to make roasted brussel sprouts with the Nuwave Oven.

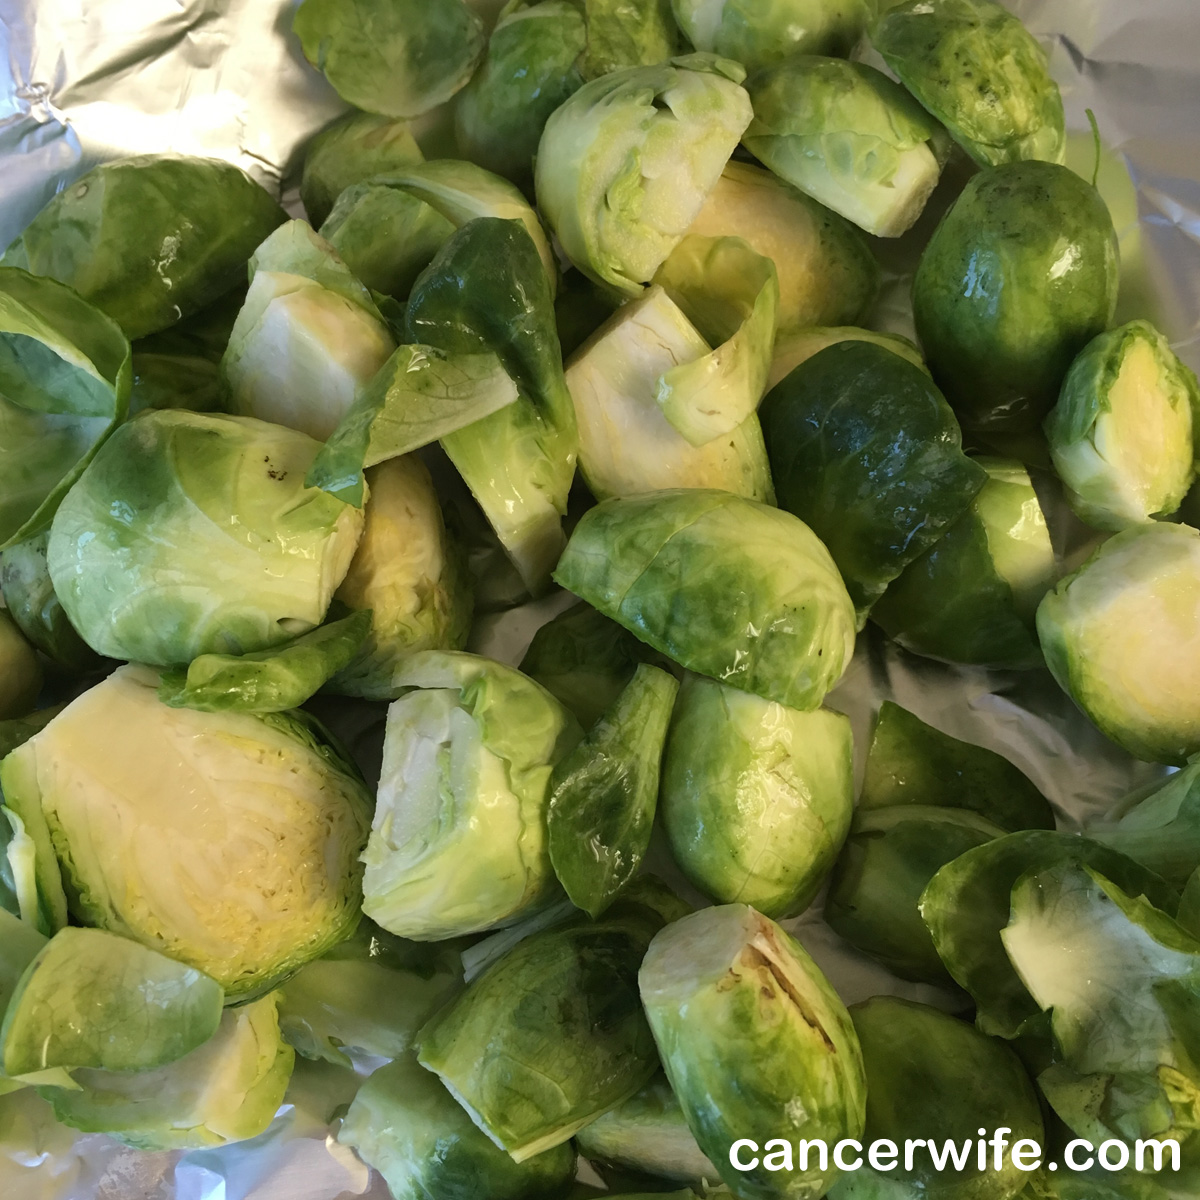
I coat the cut brussel sprouts with olive oil, followed by a sprinkling of salt and garlic powder.
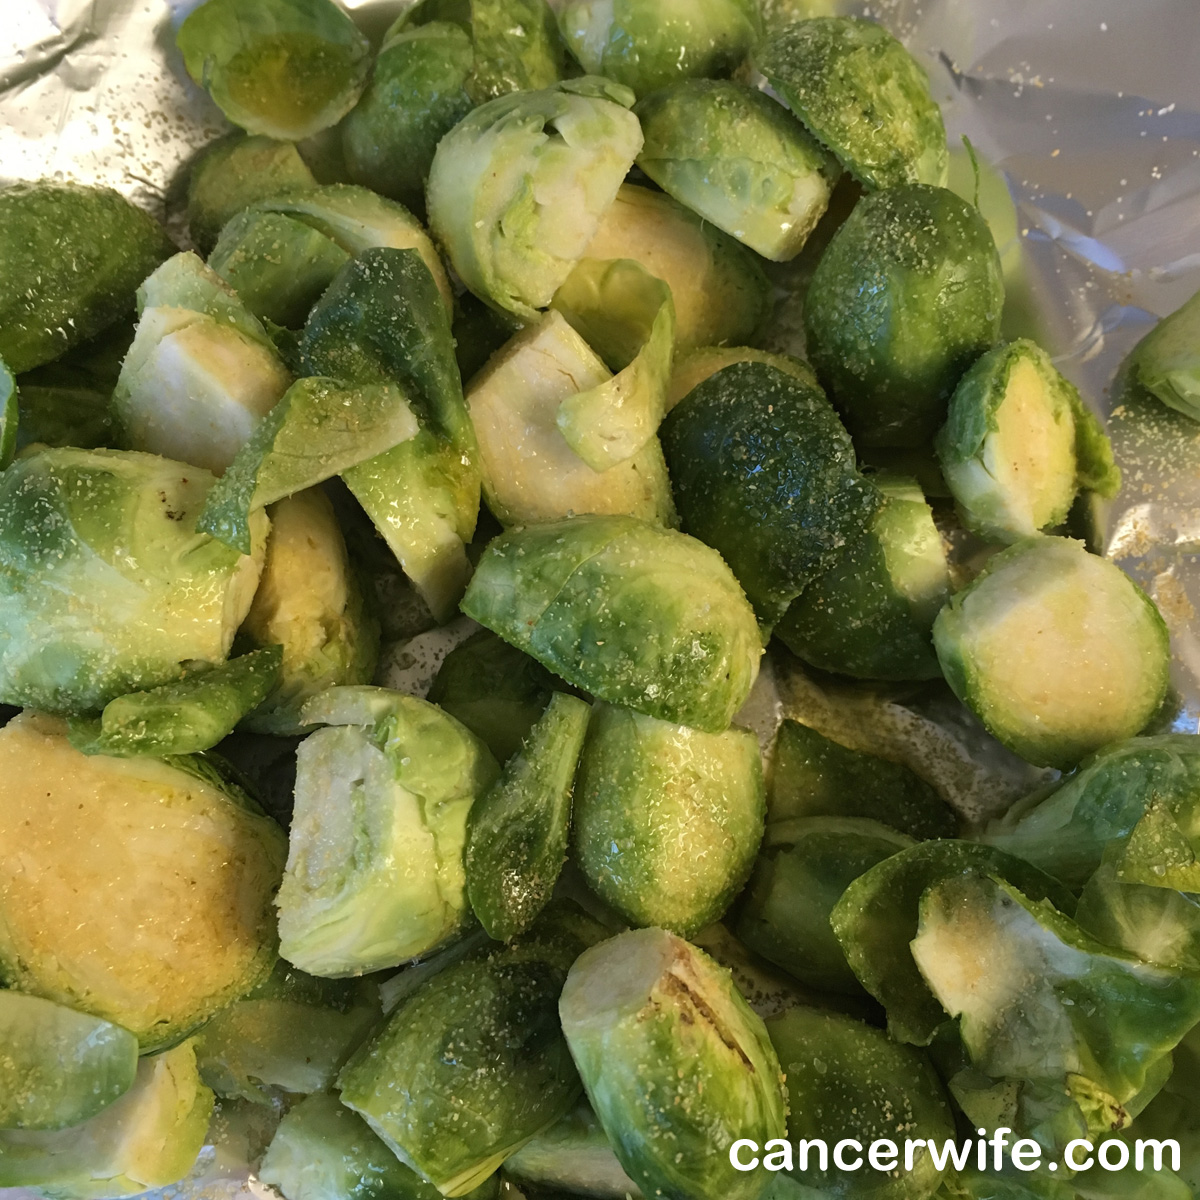
Roasted Brussel Sprouts